The page you are looking for is no longer available.
Some reasons why you stumbled upon here might be:
- The page moved or replaced
- You lost access and/or privileges
- You typed an incorrect address


Some reasons why you stumbled upon here might be:


© 20ZZ Z–CORP® LABS
ISBN:		978-0-8975-8949-5
Job number:	ZC/OPS-X.H-TDVB.ZZ03
DOI:		docs.zcorp.org/10.03.00122/00305
This publication may not be reproduced in whole or in part and in any form for any purposes without special permission from the copyright holder, provided acknowledgement of the source is made.
Z–CORP® would appreciate receiving a copy of any publication that uses this publication as a source.
No use of this publication may be made for resale or any other commercial purpose whatsoever without prior permission in writing from Z–CORP®. Applications for such permission, with a statement of the purpose and extent of the reproduction, should be addressed to the Directorate of Labs Public Relations, Communication Division, Z–CORP®, public-cd-labs@zcorp.org.
Disclaimers
The designations employed and the presentation of material in this publication do not imply the expression of any opinion whatsoever on the part of the Z–CORP® Headquarters concerning the legal status of any dimension, galaxy, planet, country, territory, city or area or of its authorities, or concerning the delimitation of its frontiers or boundaries.
Mention of a commercial company or product in this document does not imply endorsement by
Z–CORP® or the authors. The use of information from this document for publicity or advertising is not permitted. Trademark names and symbols are used in an editorial fashion with no intention on infringement of trademark or copyright laws.
The views expressed in this publication are those of the authors and do not necessarily reflect the views of Z–CORP® and DEDRA®. We regret any errors or omissions that may have been unwittingly made.
© Maps, photos and illustrations as specified.
Suggested citation:
Z–CORP® LABS et al. (20ZZ): Development Handbook for Builders™. Z–CORP LABS Handbook. Aubervilliers. docs.zcorp.org/10.510.00122/00027
URL: zcorp.org/labs/resources/handbook/trials-builders-development-handbook-20zz
CLASSIFICATION [C] CLASSIFIED DOCUMENT
Not for public access in any form whatsoever. Do not redistribute.


Z–CORP INTERNAL PRINT CENTRE IDENTIFICATION RECEIPT
ID:		OPSX
PRINTER ID:	ZPC?01032150
DATE:		20ZZ-03-08 22:00
LOCATION:	ABV/FR
Congratulations on your new role as Builder™. Here at Z-corp™, we are committed to upholding our standards of competency in every position, no matter the level of experience. This Handbook™ will get you started on your journey to becoming a knowledgeable and efficient designer, and will serve as an absolute reference for any question you may have regarding the Level Editor™.
This Handbook may be changed without notice. Make sure to keep the Handbook accessible for future reference in order to stay up-to-date with any changes.
Failure to comply with every rule stated in the Handbook will result in immediate termination of contract.
Builders™ requiring an updated copy of the Development Handbook™ for Builders™ should consult the Builder™ & Runner™ Liaison Department, located in Floor A23-1637B in the ABV Office, France. Internal extension no. is: 1002.
Last updated XX/XX/20XX
If you're using the physical copy, simply turn the pages using either hand and/or fingers.
If using the digital copy, use the left-hand sidebar or click through the footer of each page. Additionally, you can use the arrow keys ← → or swipe side to side on your mobile device to turn the pages.
Step-by-step instructions to get a project initialised and set up.
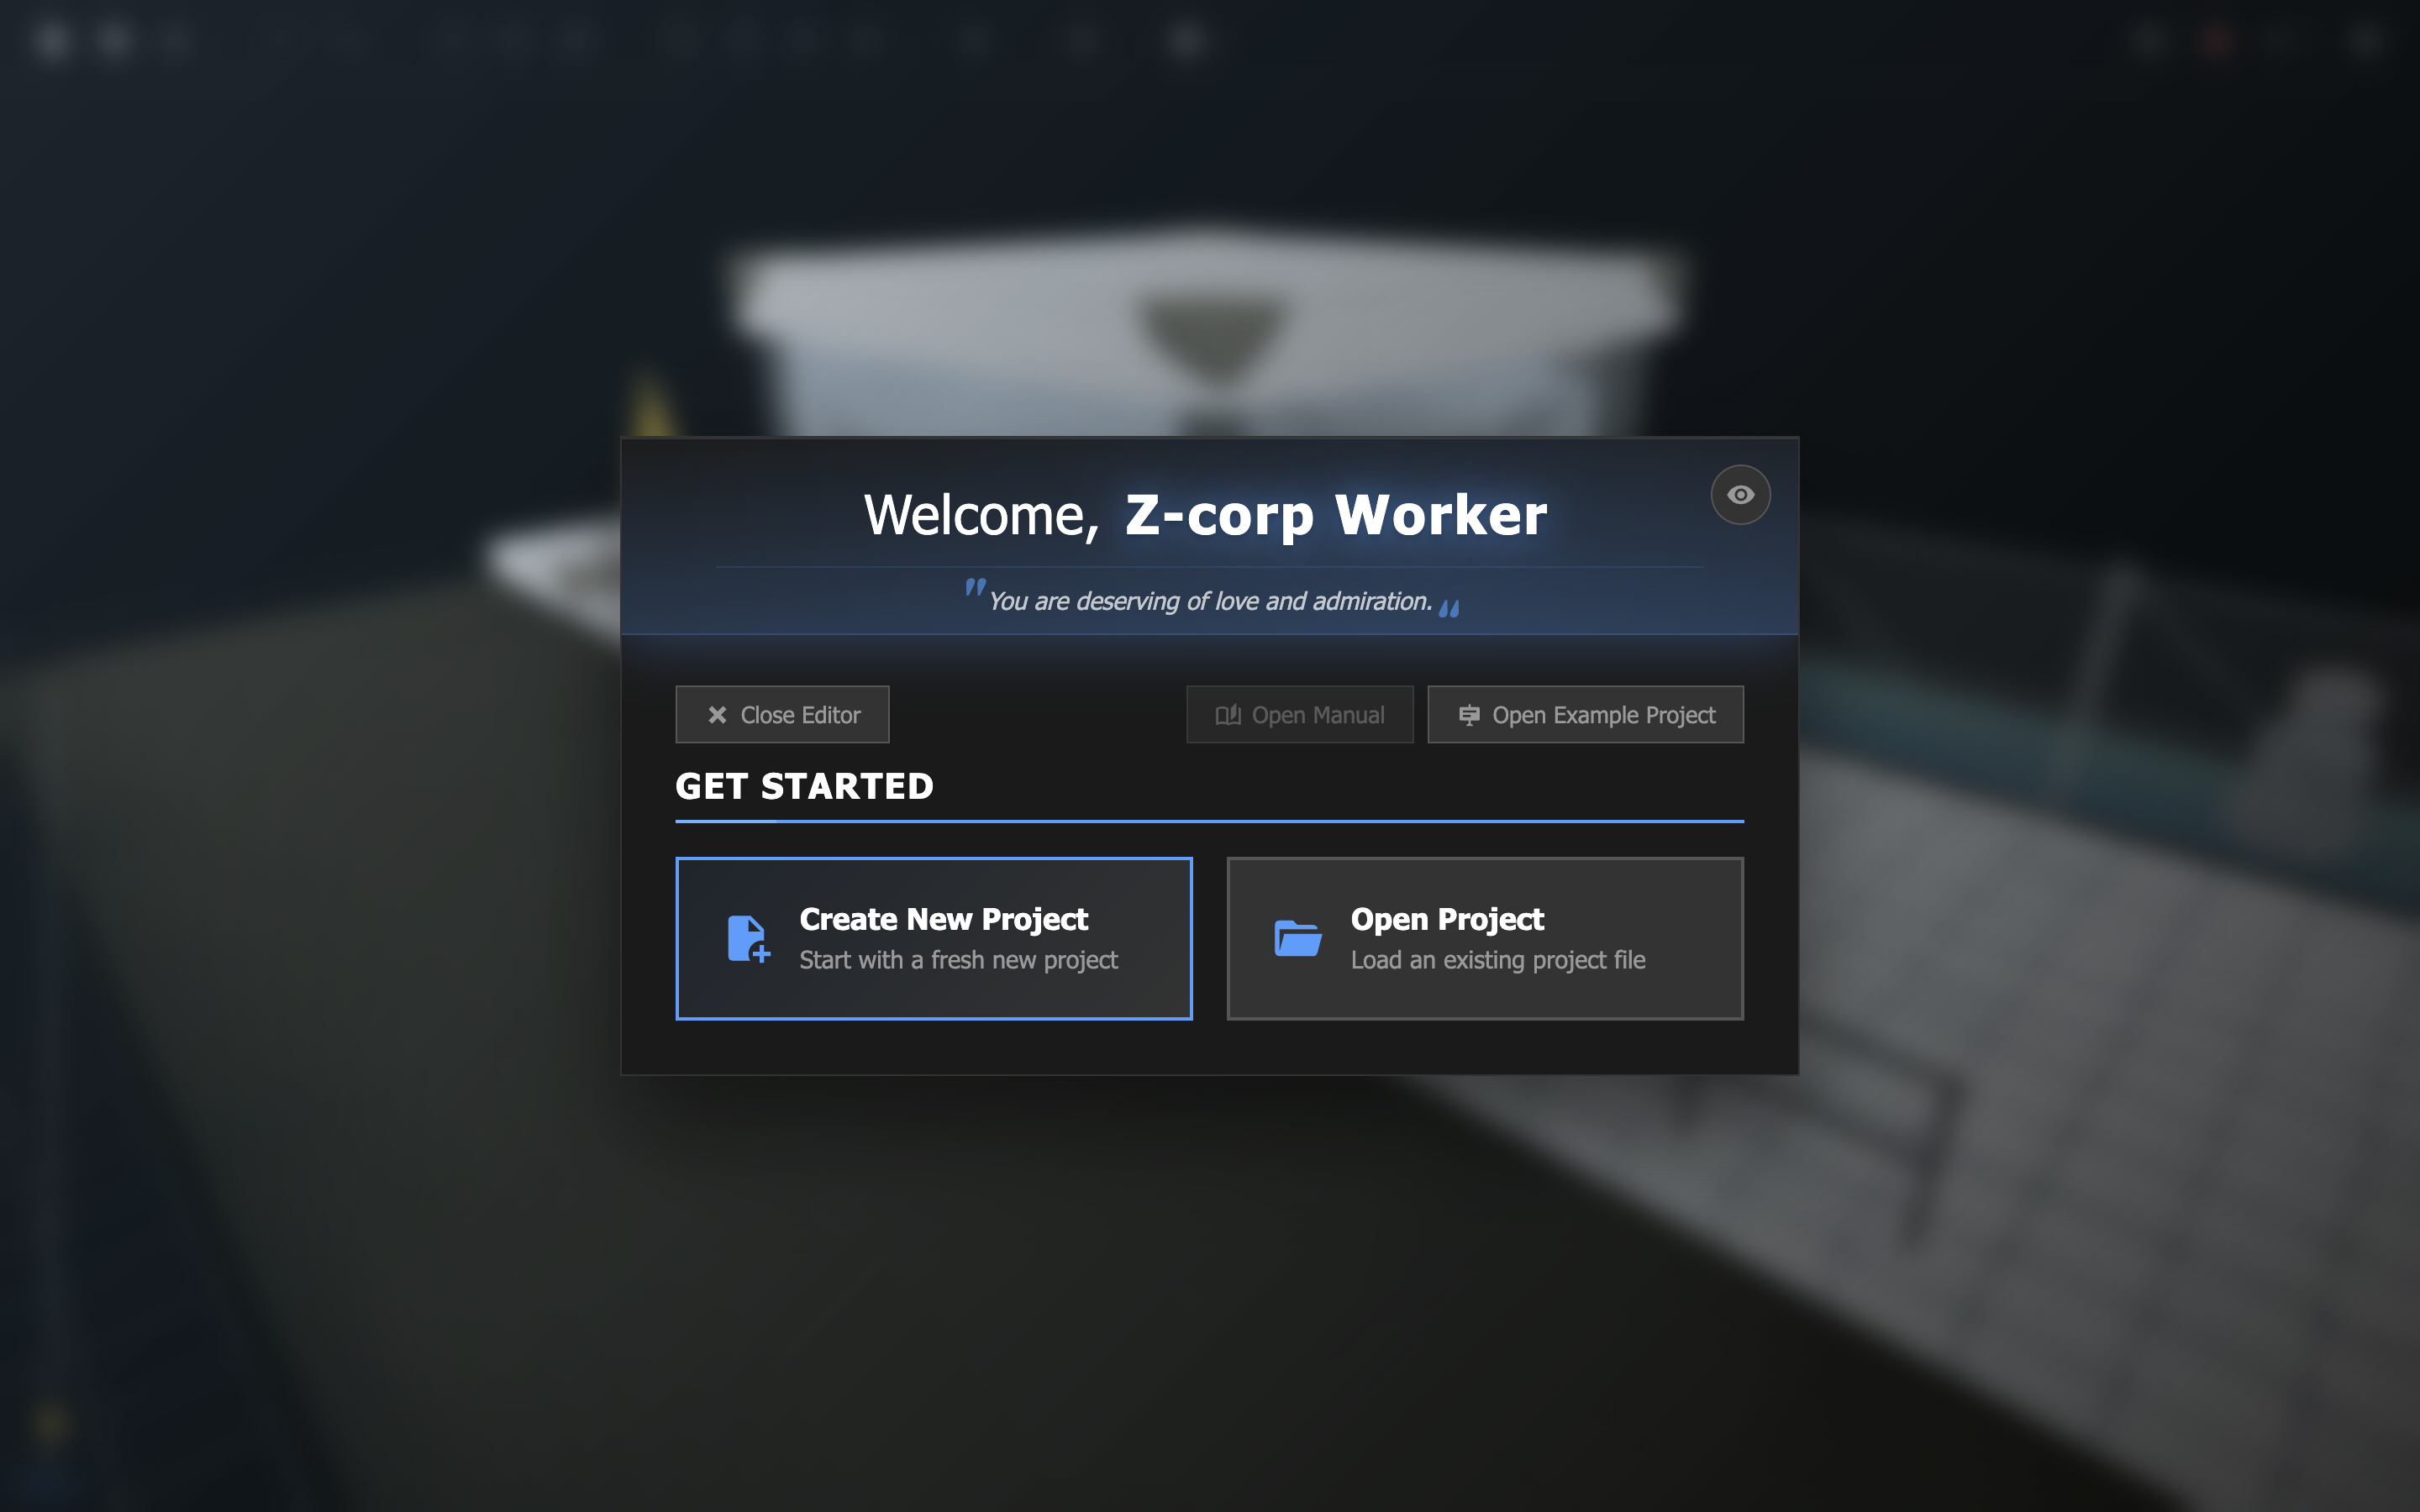
On the startup menu of your machine, you will find a program simply titled Level Editor. Click the program to open it. You will then be greeted by the Welcome menu.
Although there is no clear visible trademark (™) on this occurrence of the Level Editor™, Z–CORP® emphases that the Level Editor™ is indeed trademarked and any breach of said trademark will result in legal pursuit.
To create a new project, simply click on the Create New Project button from the Welcome menu.
Alternatively, if you want to start from an existing project...
You can load any local project file by selecting the Open Project button.
If you've recently worked on a project, you'll find it listed under Recent Projects.
If you'd like to check out the example project showcased in the background of the Welcome menu, you can open it by clicking on Open Example Project on the top left. This action is recommended if this is your first time creating a Trial™.
Use your keyboard and mouse to move around the scene or change your viewing angle.
| Key | Action |
|---|---|
| W / Z / Up arrow | Move forward |
| A / Q / Left arrow | Move left |
| S / Down arrow | Move backward |
| D / Right arrow | Move right |
| Space | Move up |
| Shift + Space | Move down |
| Middle click + Mouse | Look |
Camera movement speed and camera rotation speed can be configured in the Level Settings menu.
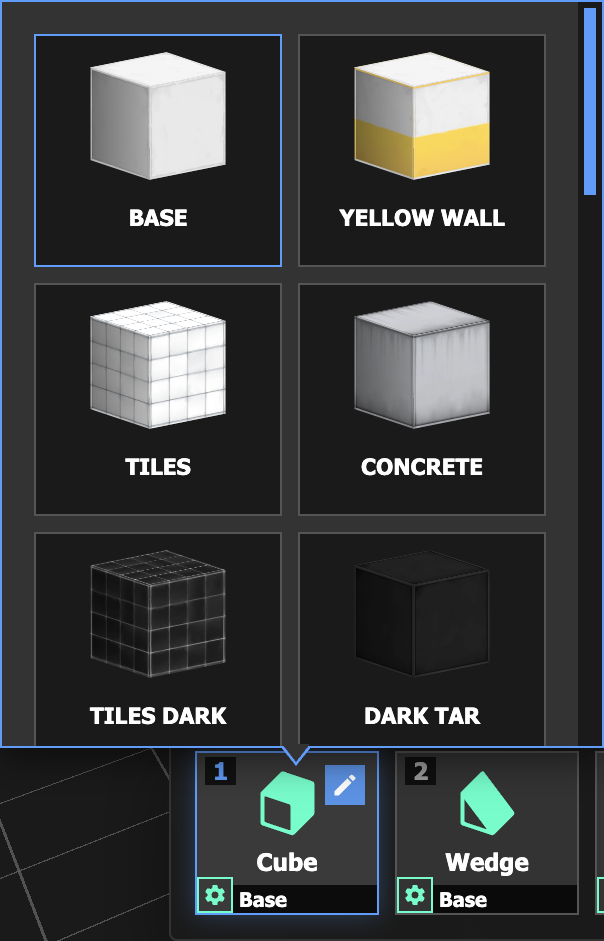
To place an object, first choose a preset from the Object Preset menu.
You can access the Object Preset menu by clicking on an empty slot in the Object tray, or by hovering over a non-empty slot and clicking on the pencil icon ![]() .
.
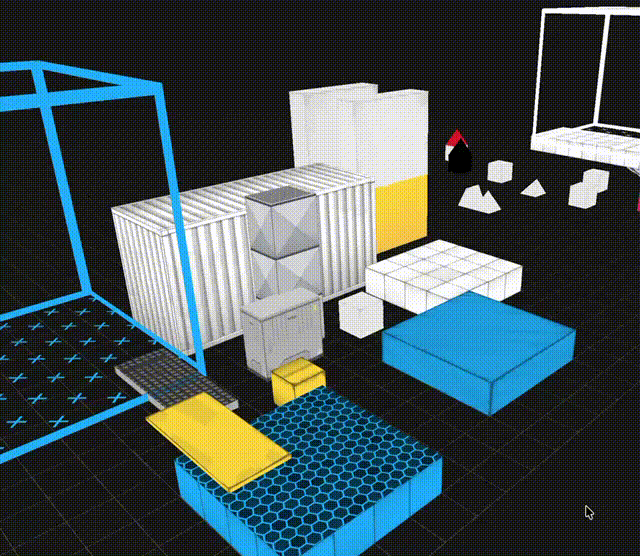
Once you've loaded your preset of choice into the Object tray, right-click in the scene view to instantiate the object. Objects can be placed against other objects or on top of the grid floor.
By default, objects will snap to a 64x64x64 grid. You can toggle grid snapping from the toolbar ![]() . Snapping behavior can also be further configured in the Level Settings.
. Snapping behavior can also be further configured in the Level Settings.
Use the bottom left slider to change the z-position of the grid floor.
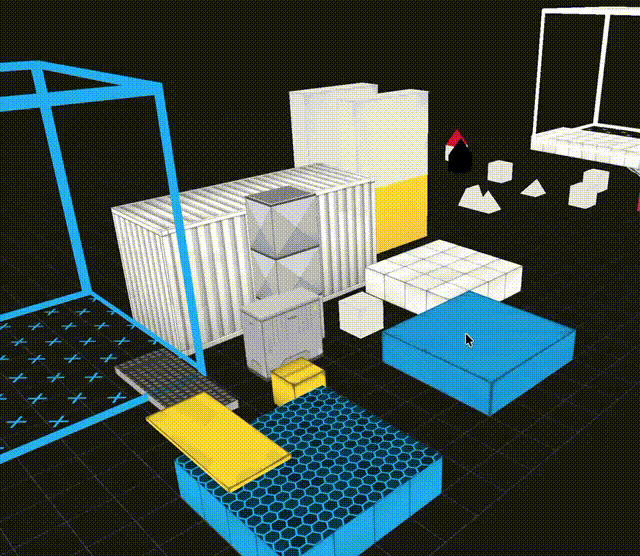
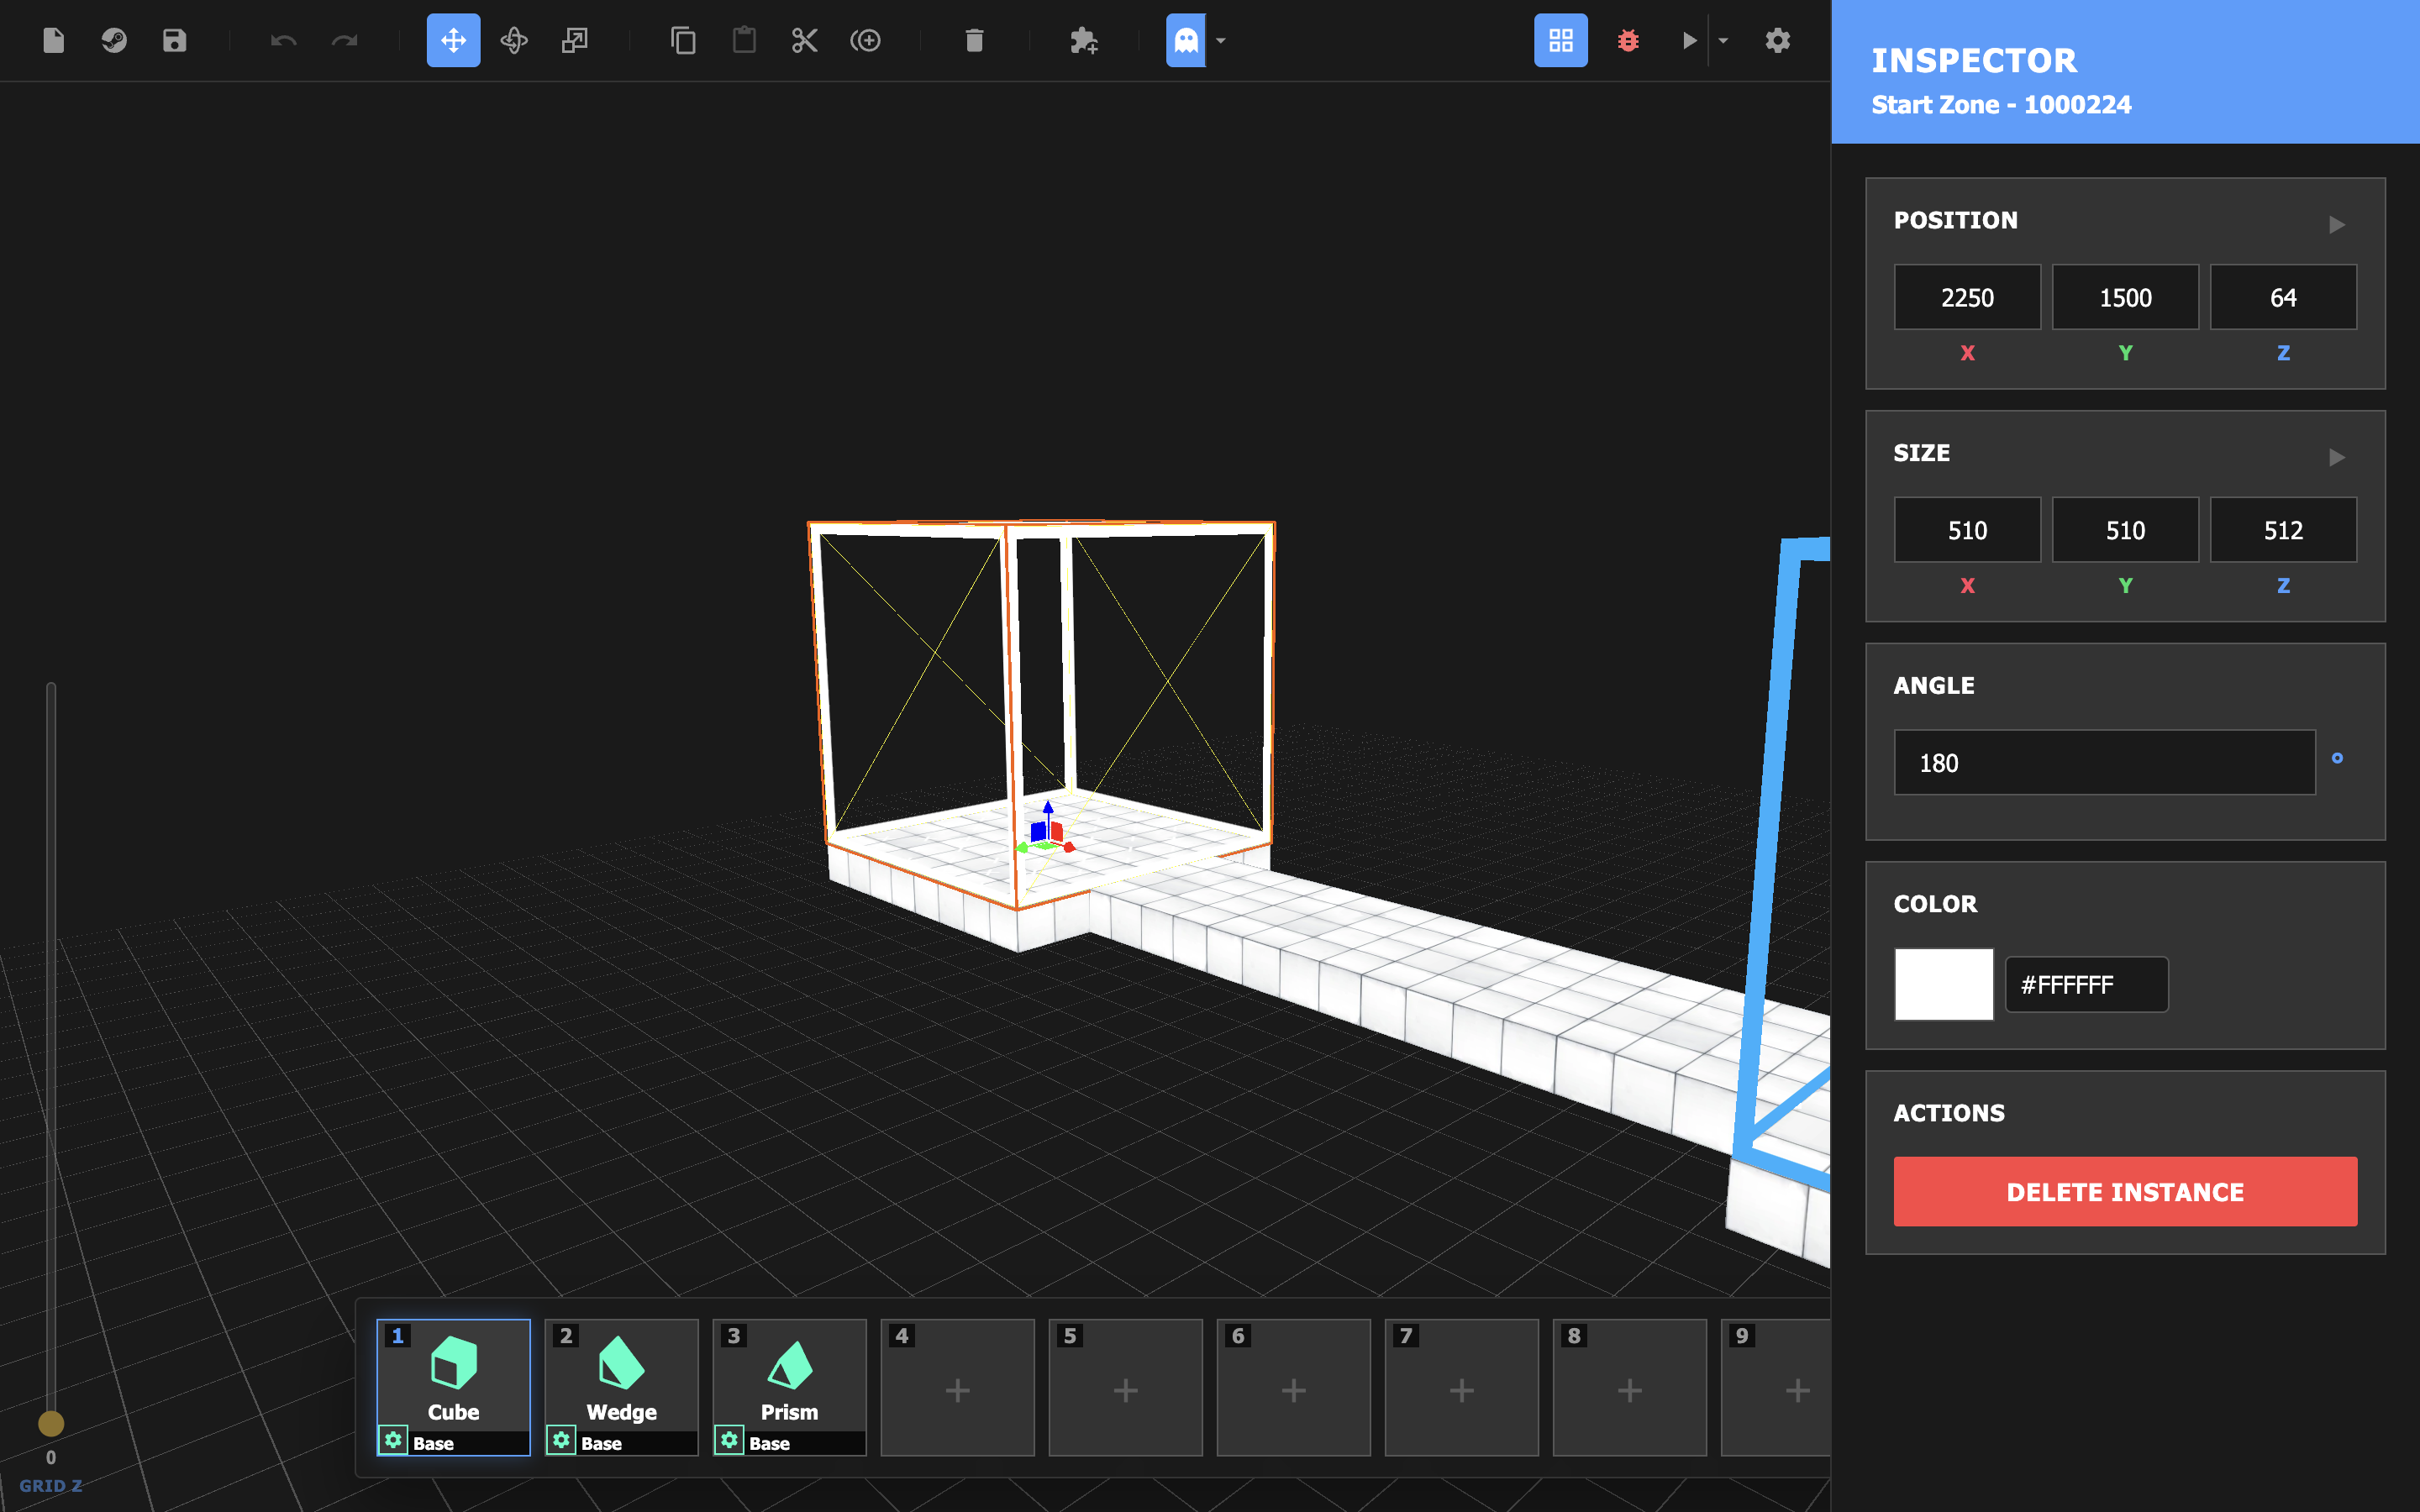
When an object is selected, you can alter it using the transform tools in the toolbar or by modifying its values in the inspector.
You can press Tab to quickly cycle between the different transform tools.
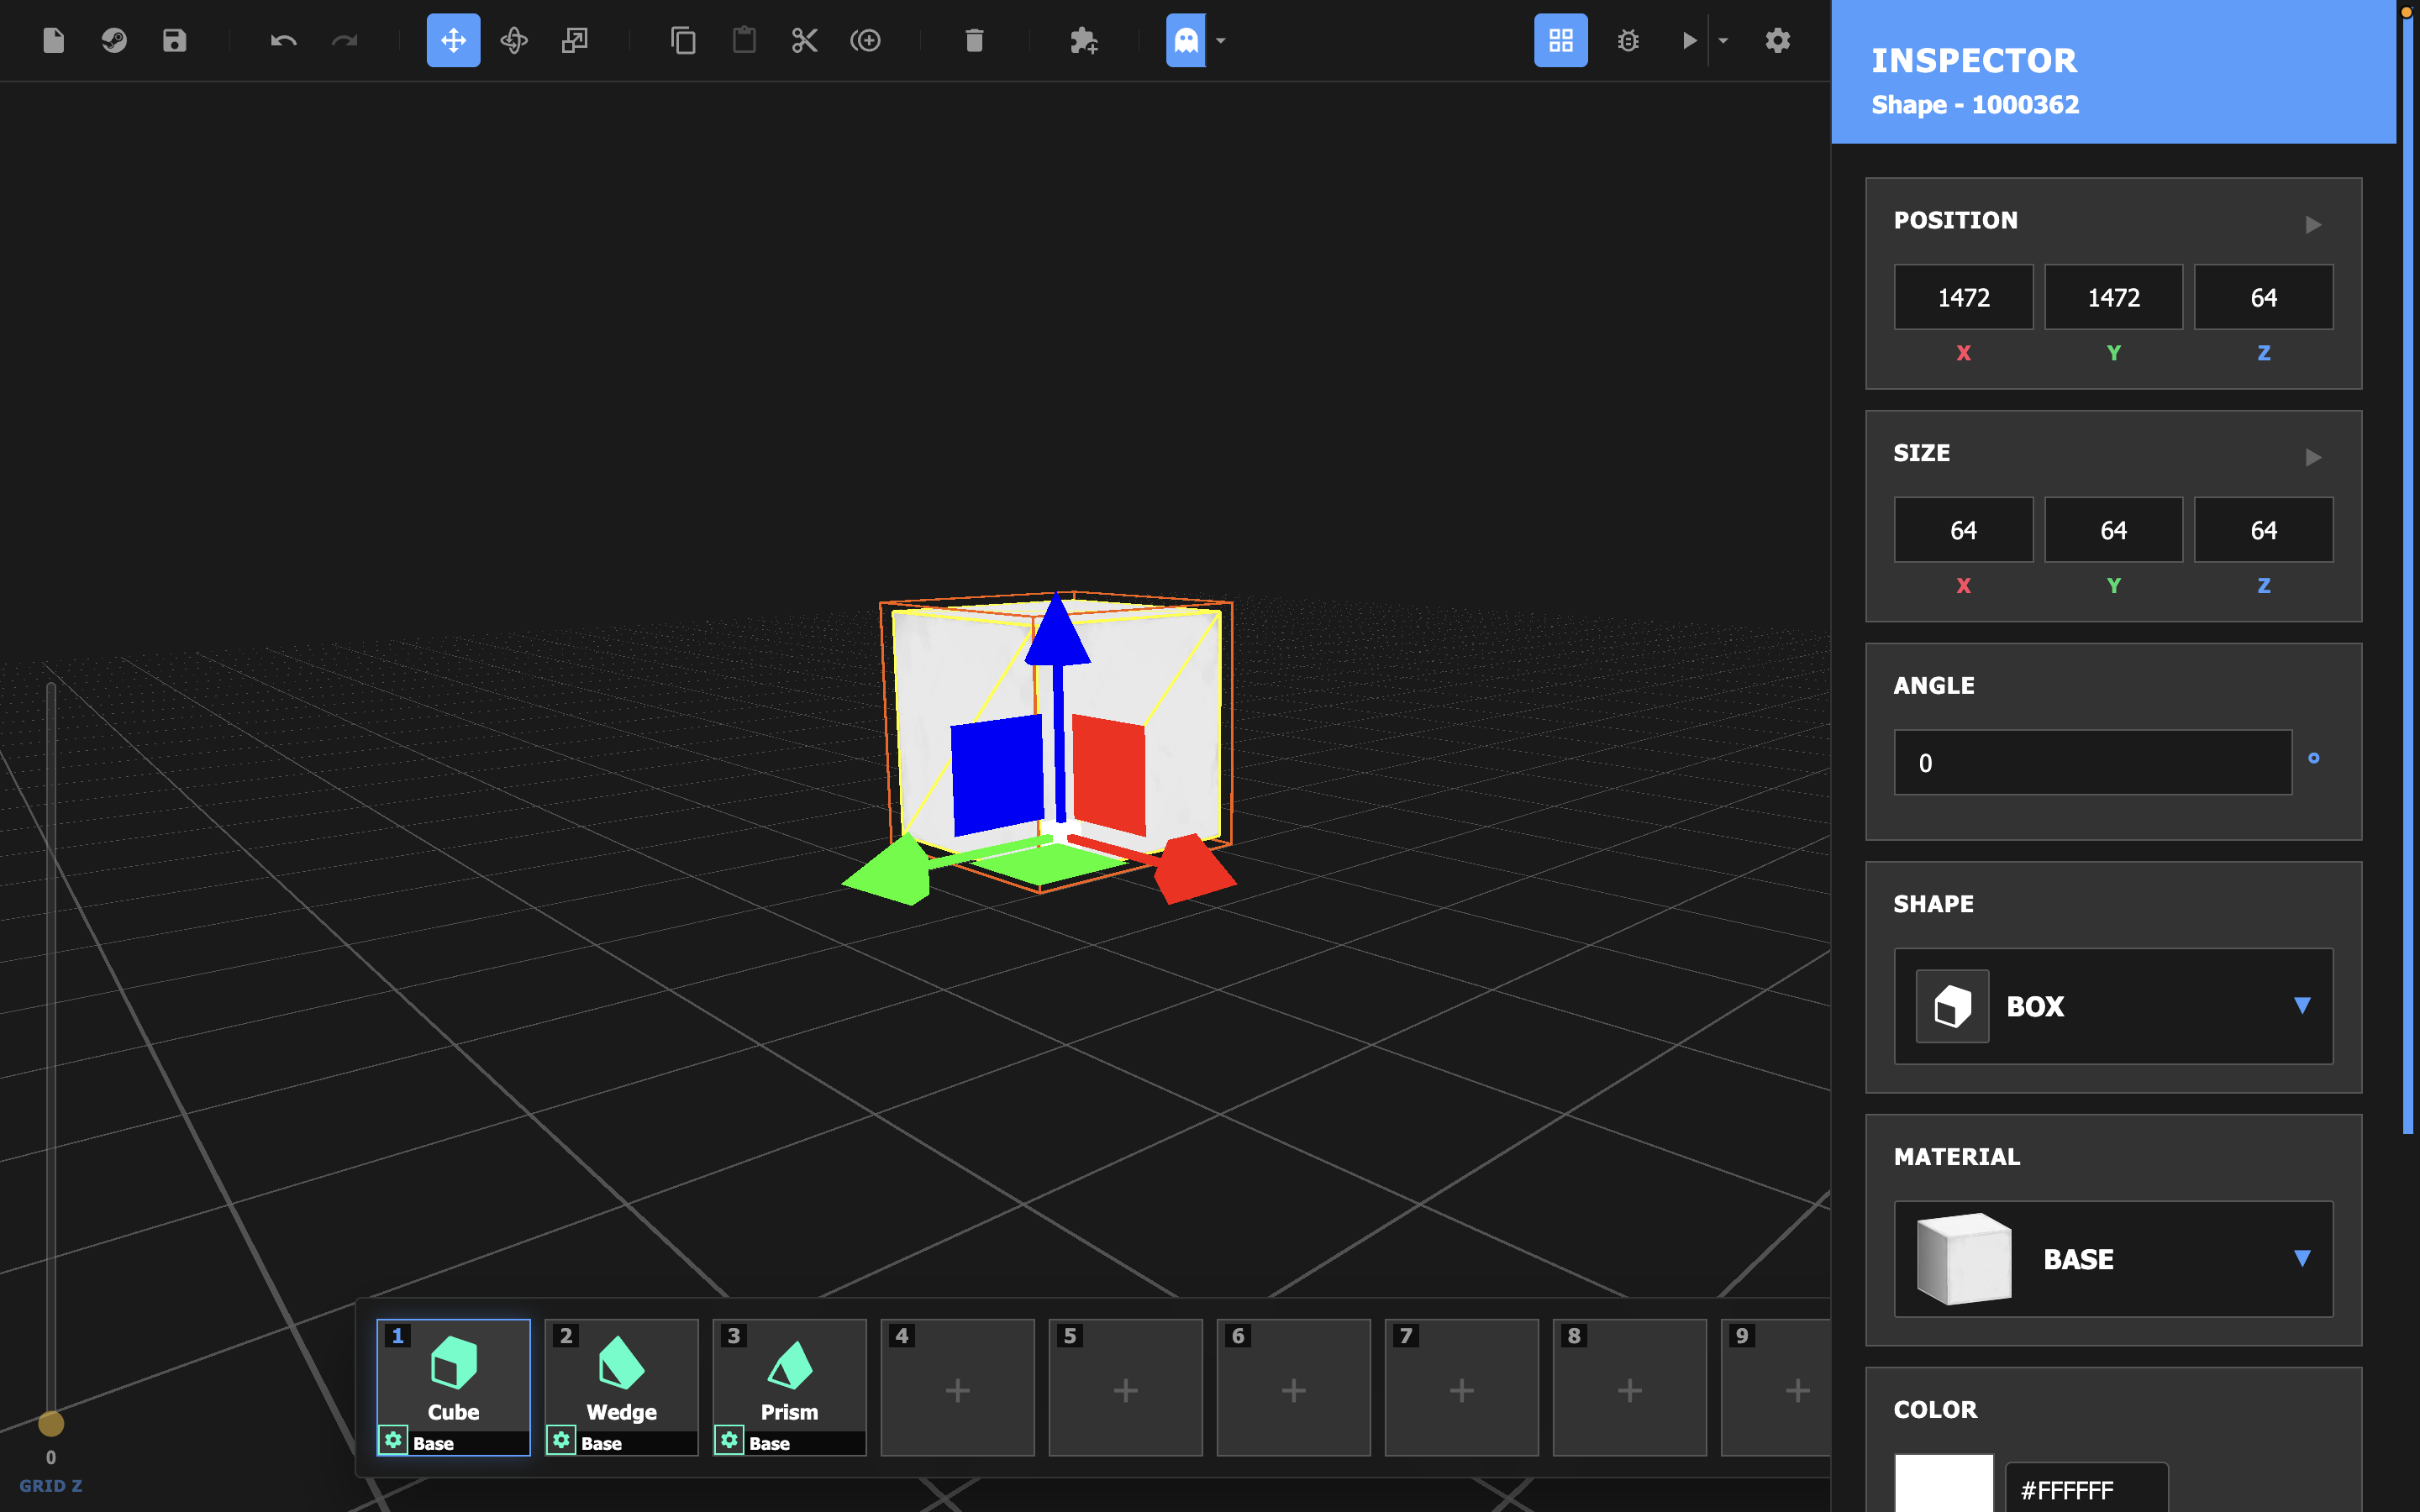
The move tool ![]() enables axis and face handles that allow you to precisely position the selected object. Simply click and drag a handle to move the object along that axis or face. This will modify the object's position variable.
enables axis and face handles that allow you to precisely position the selected object. Simply click and drag a handle to move the object along that axis or face. This will modify the object's position variable.
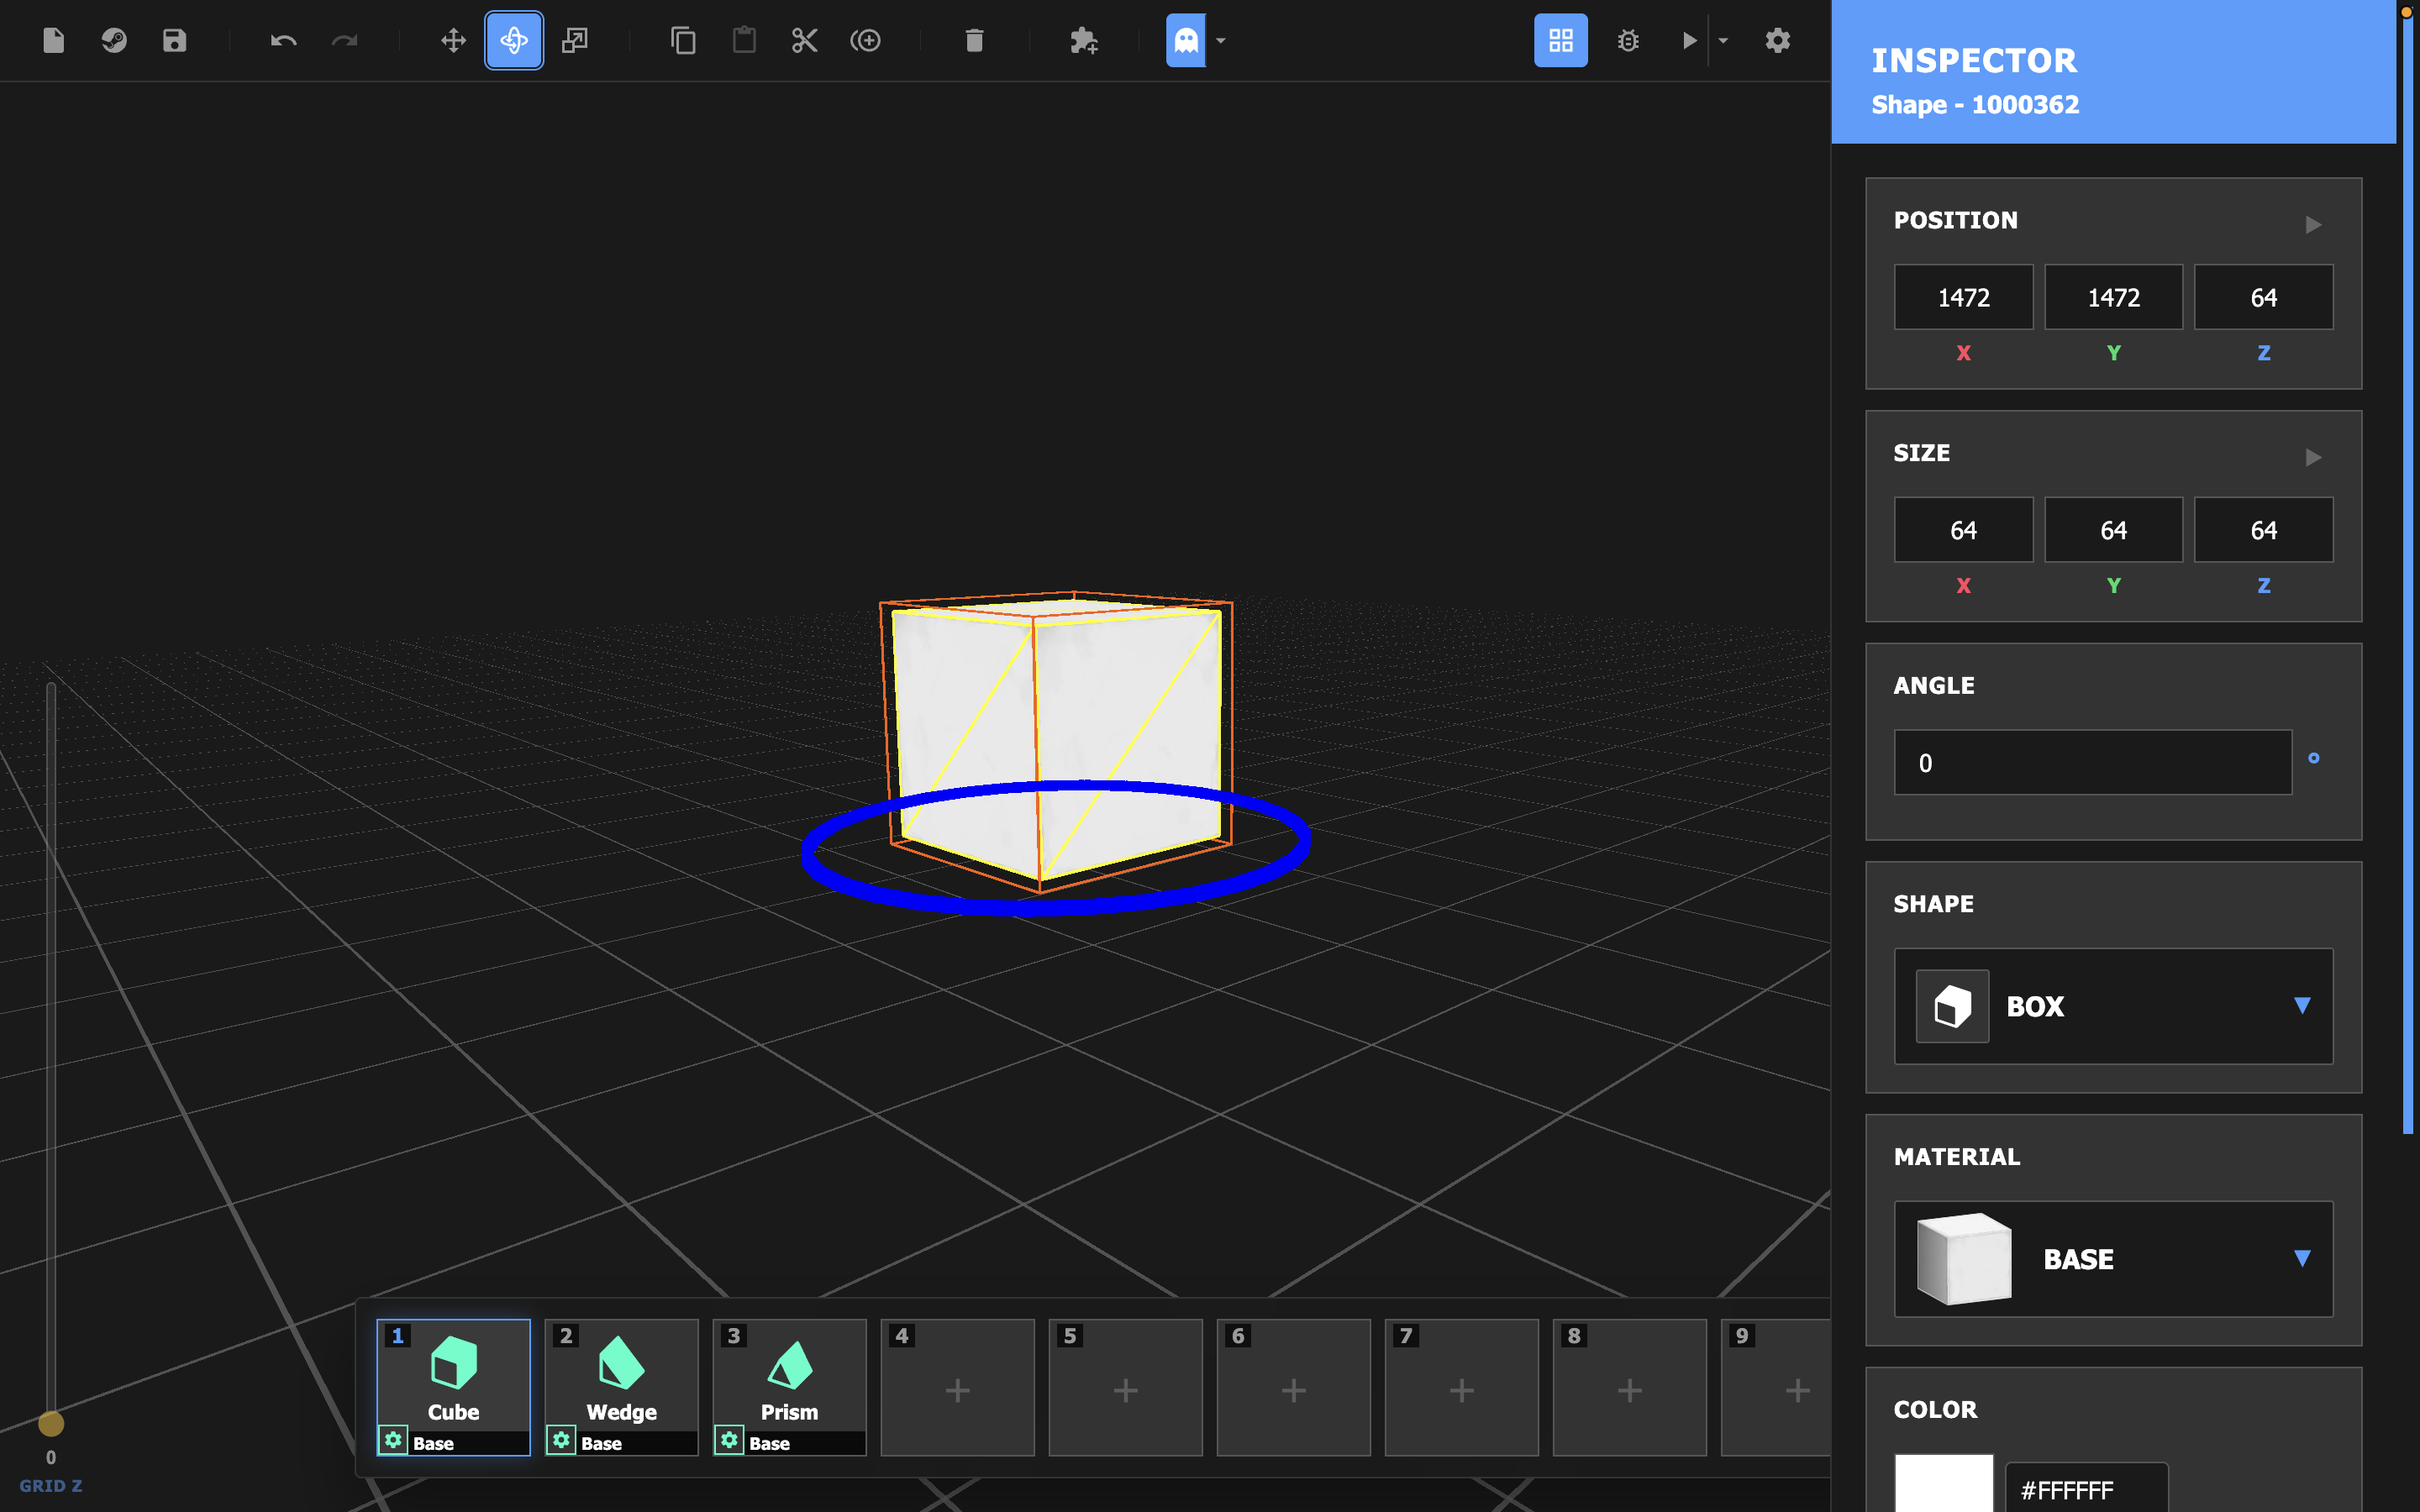
The rotate tool ![]() enables a circular rotation handle. Simply click and drag the handle to turn the selected object. This will modify the object's angle variable.
enables a circular rotation handle. Simply click and drag the handle to turn the selected object. This will modify the object's angle variable.
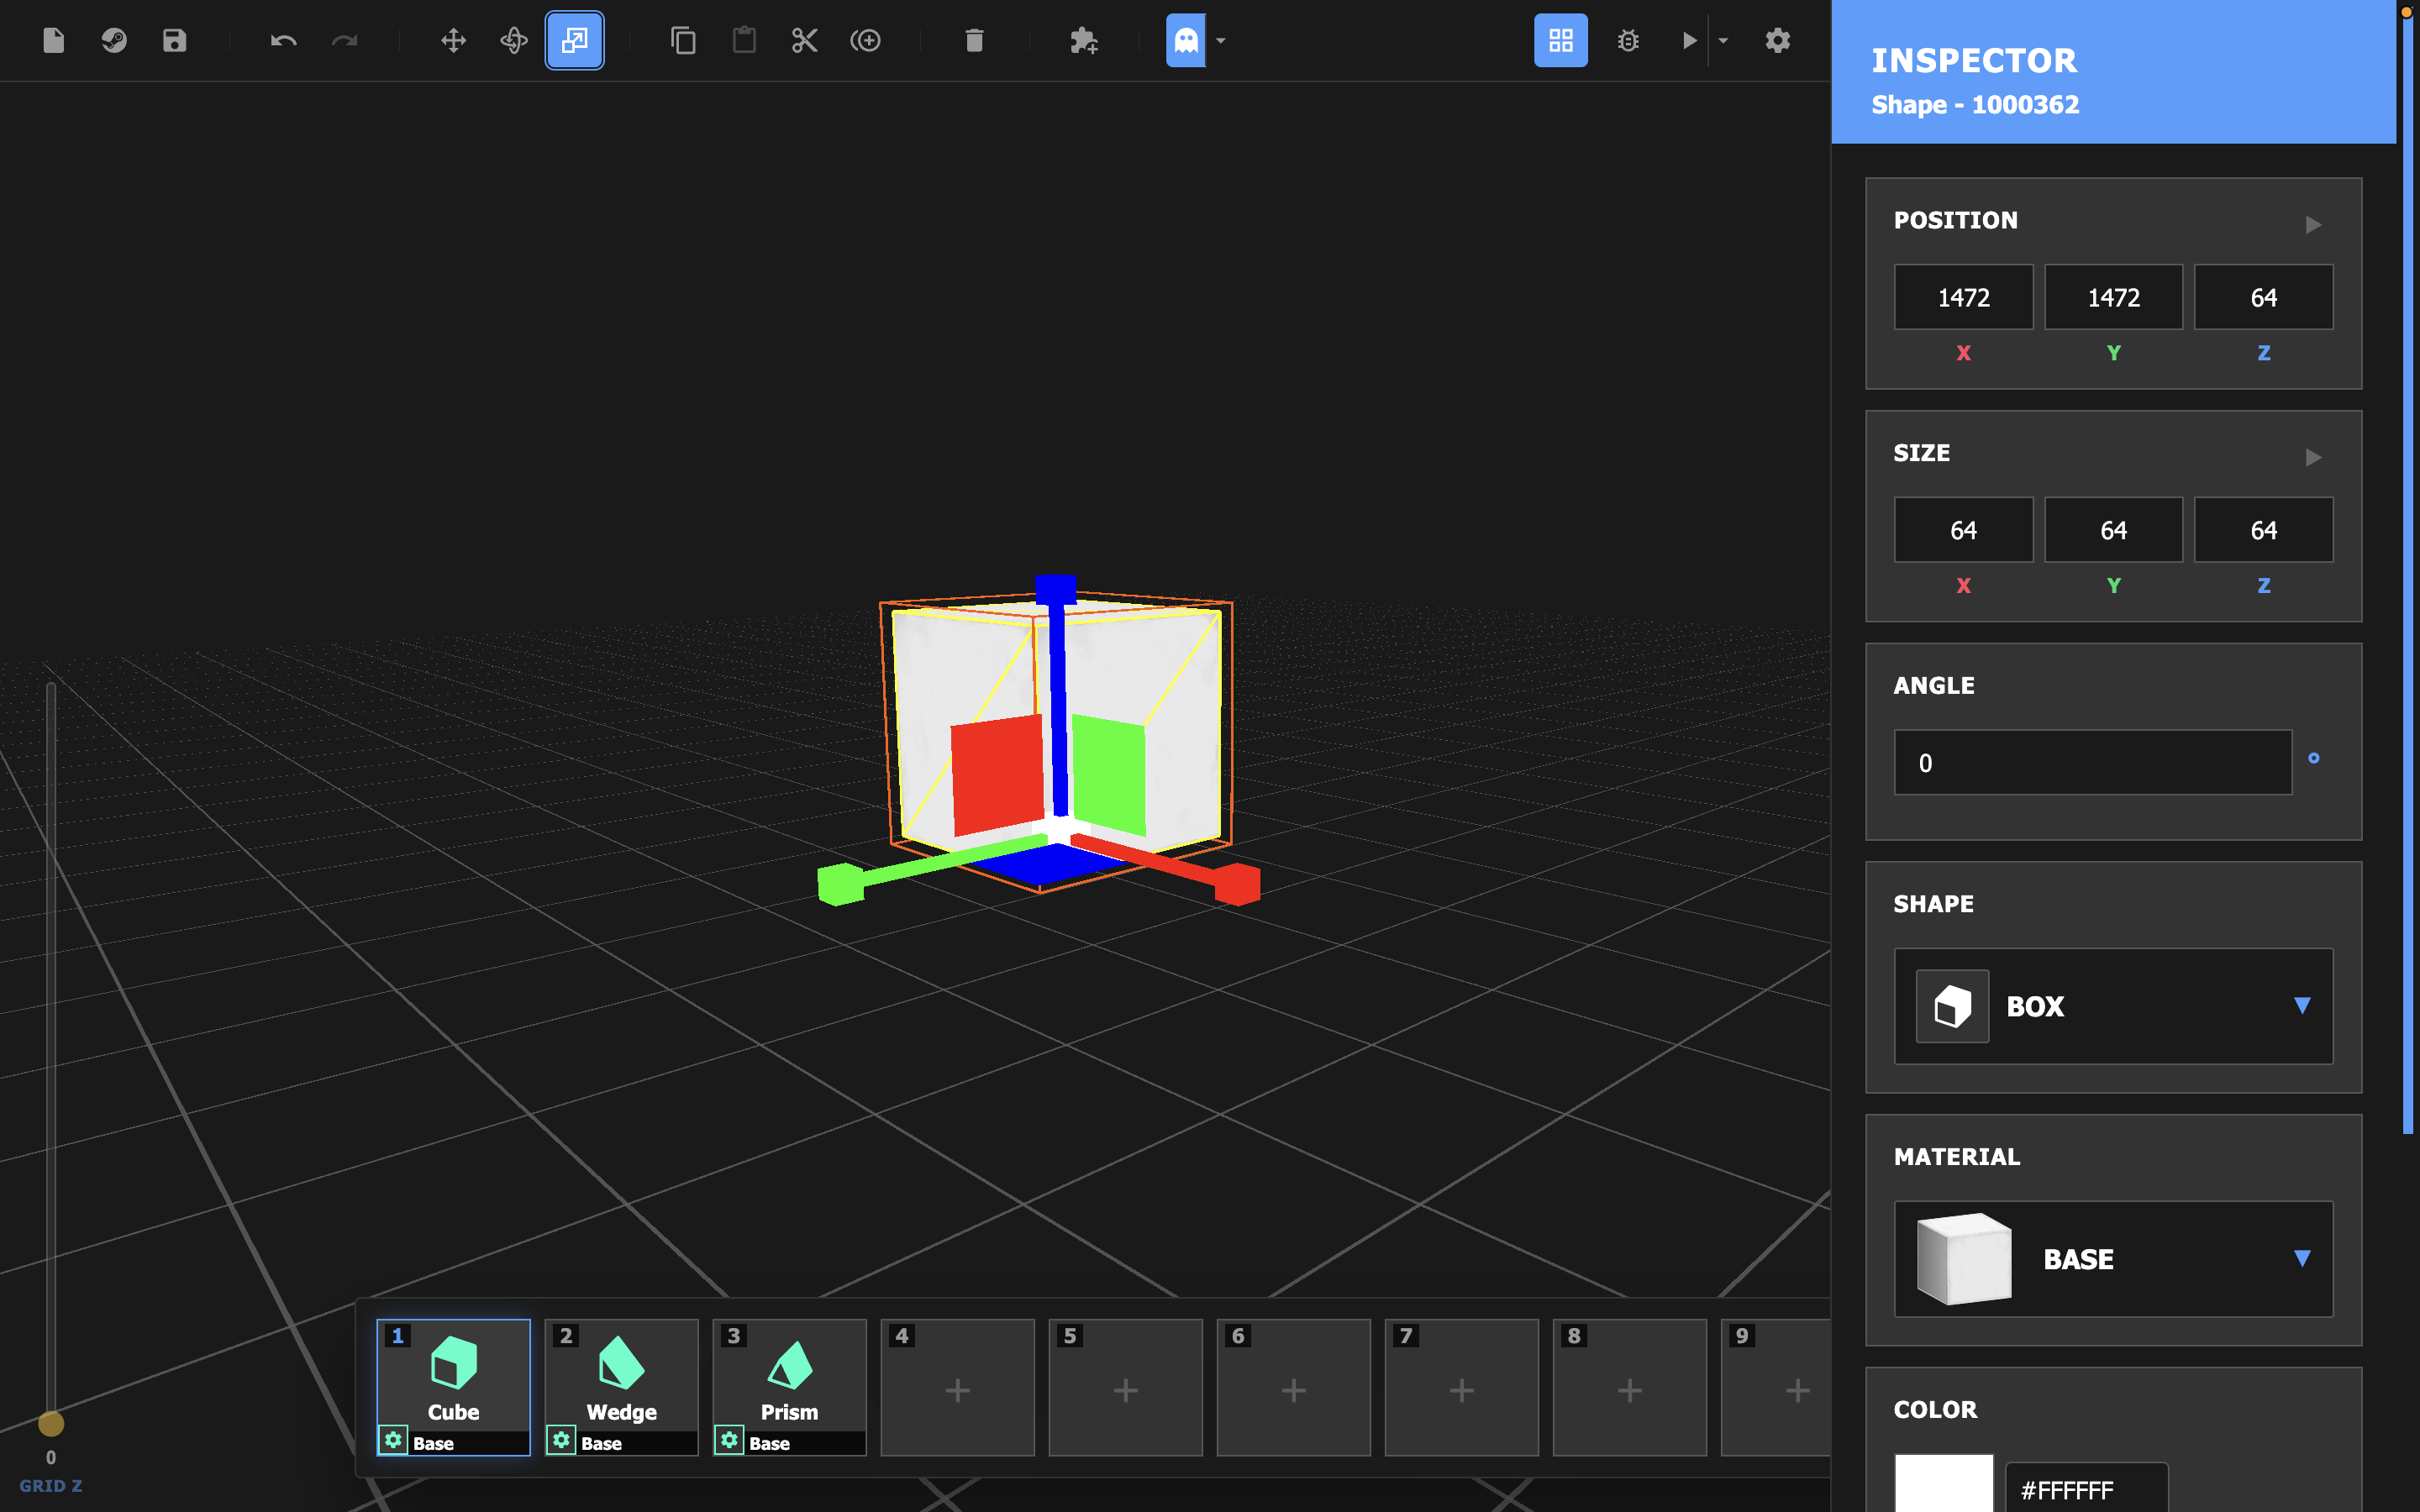
The scale tool ![]() enables axis and face handles that allow you to resize the selected object. Simply click and drag a handle to scale the object along that axis or face. This will modify the object's size variable.
enables axis and face handles that allow you to resize the selected object. Simply click and drag a handle to scale the object along that axis or face. This will modify the object's size variable.
If you are familiar with similar digital editing programs, you will have noticed that you can select an object by left clicking it.
You can select multiple objects at once by dragging out a selection field or holding shift and clicking. Any transformations (moving, rotating, scaling) done to this selection will be applied to all objects.
Press Delete or Backspace, or select the Delete Instance action from the inspector to delete selected objects.
Deleted the wrong thing?
You can undo your changes by pressing Ctrl+Z (or Command+Z on Mac).
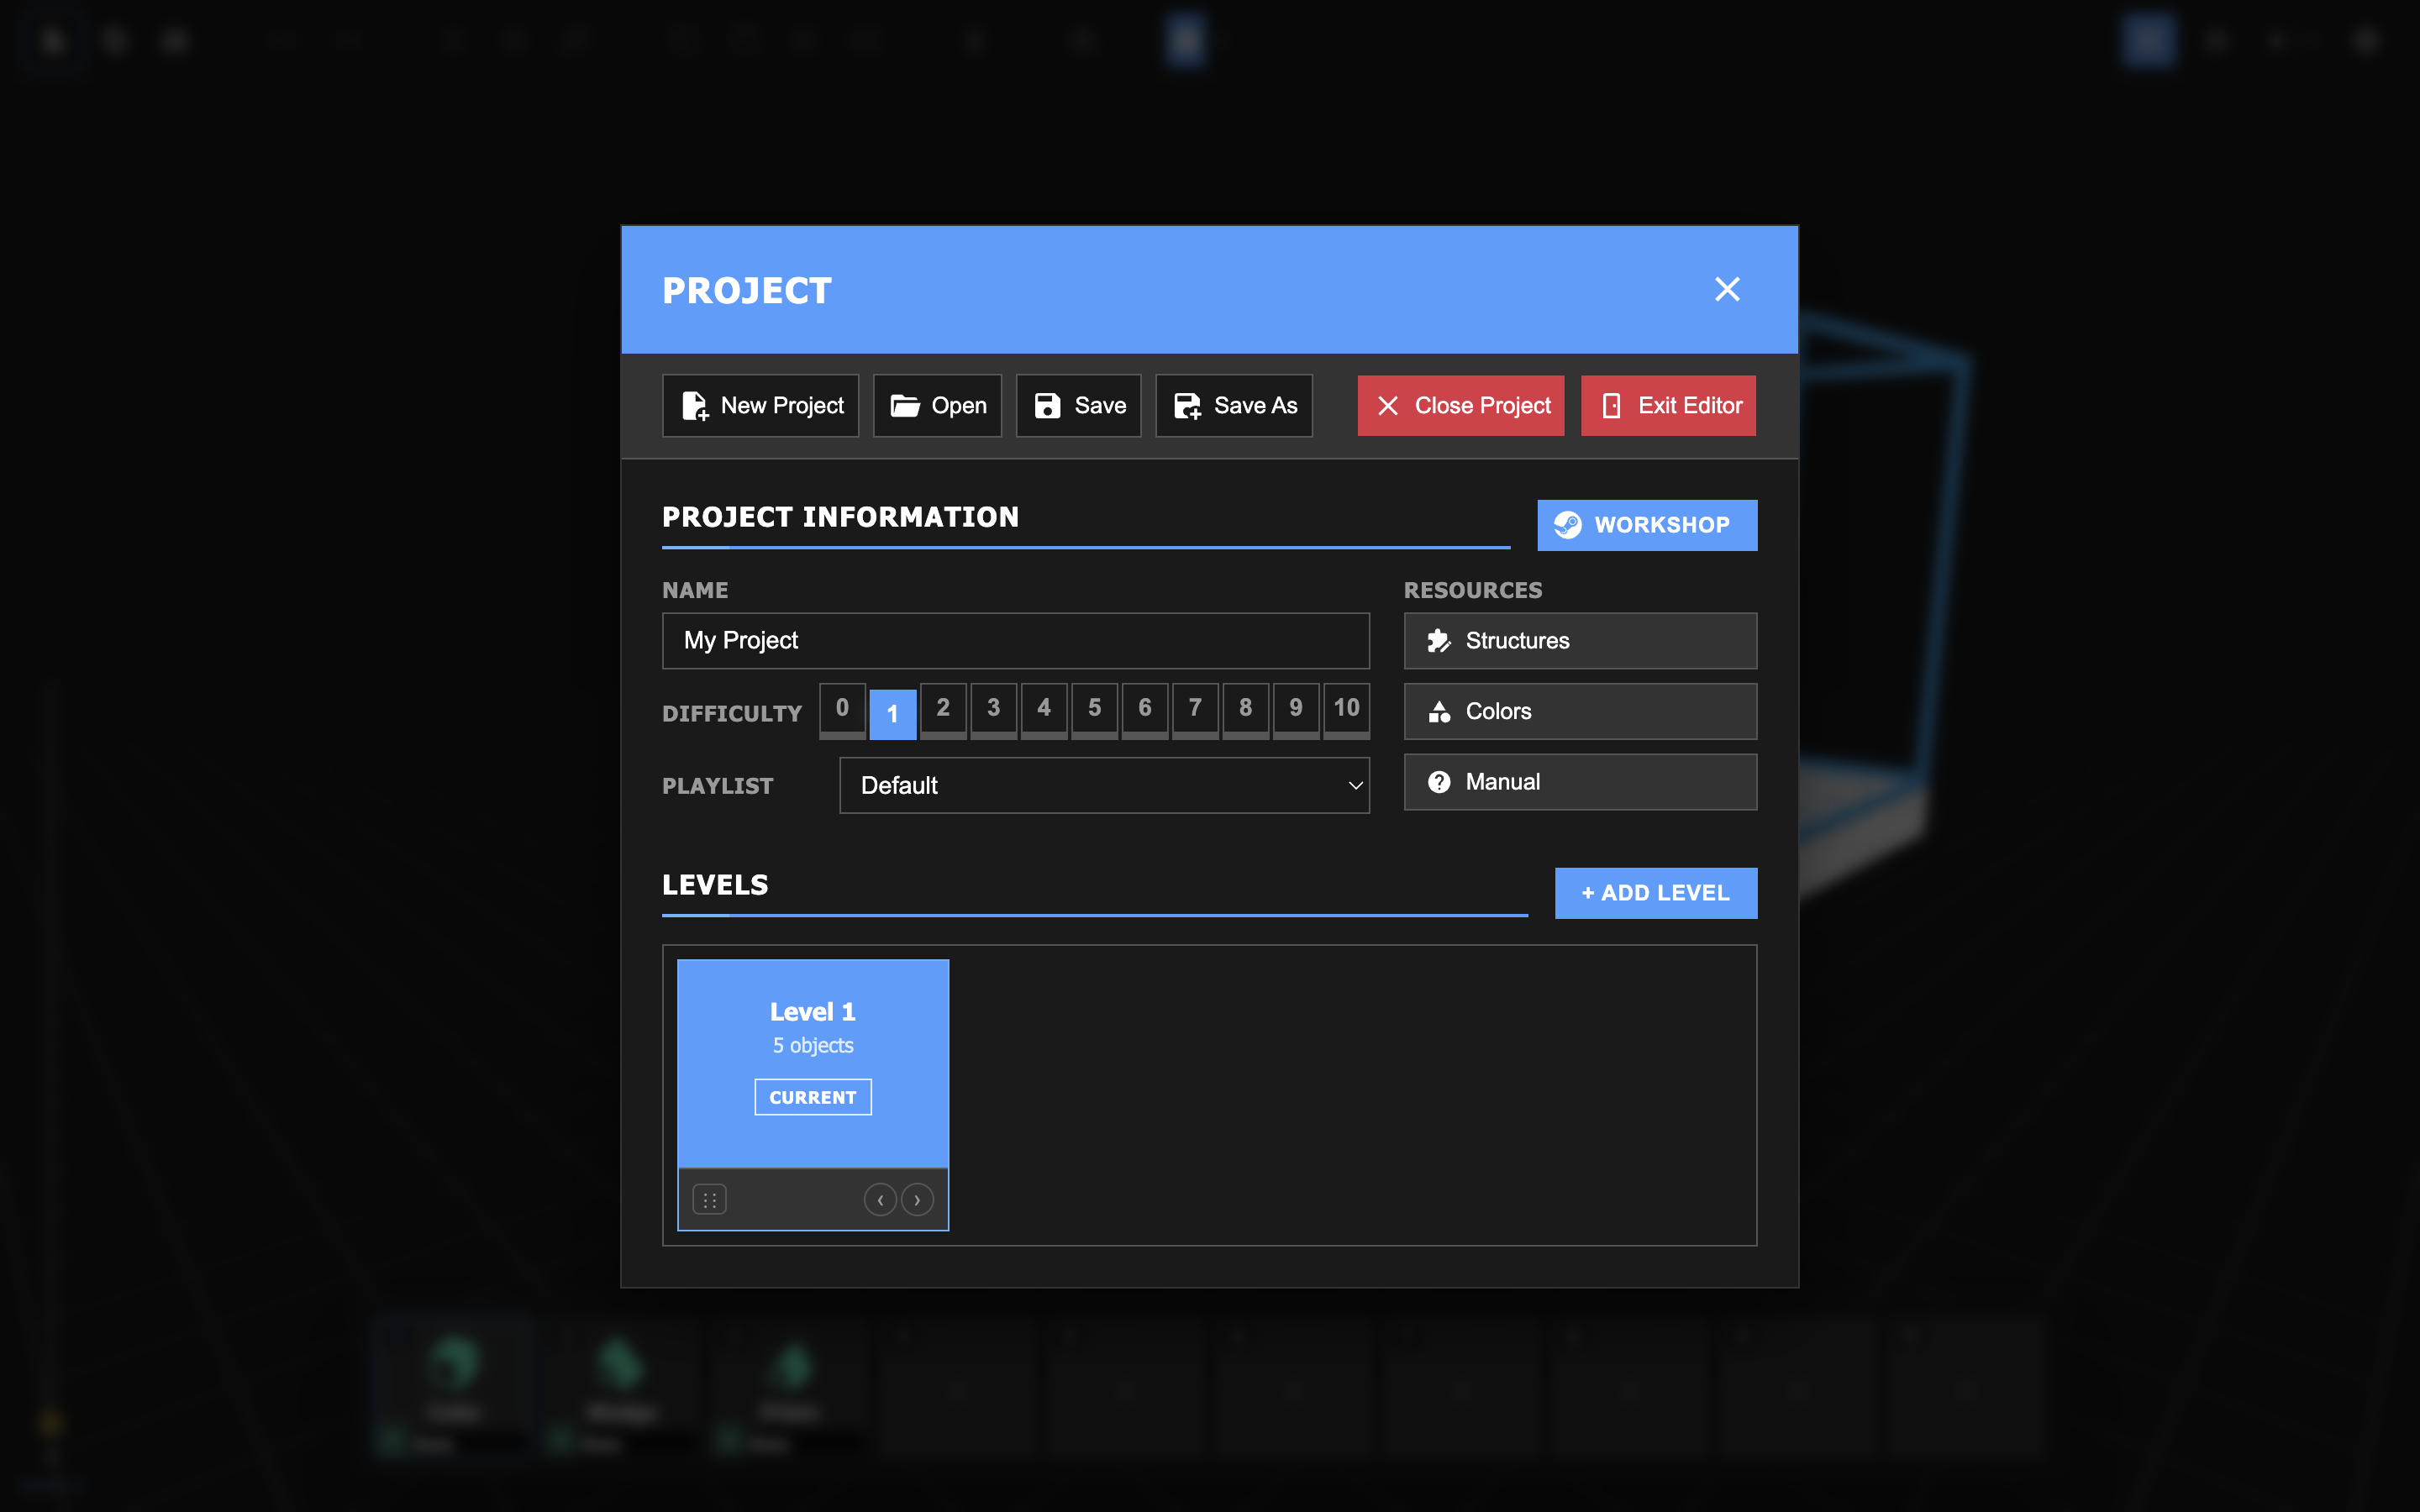
Projects can contain a series of levels. If a project has more than one level, runners will be made to complete it in sequence.
As a Builder, it is vital to test a project before shipping it. Playing a level will provide you with the data and insights necessary to ensure that the map has been designed to the correct specifications.
Simply select the Play ![]() button from the toolbar to test your level. You can return to the level editor at any point from the pause menu.
button from the toolbar to test your level. You can return to the level editor at any point from the pause menu.
If your level contains issues, you will not be able to play it. Turn to the next page for more detail on handling issues.
The Issues menu contains information on any mistakes or potential game-breaking bugs your level may contain.
For example, if your level is missing a Start Zone or End Zone, a Runner will not be able to begin or complete the level. This will be flagged as an error that will prevent you from playing or submitting a level.
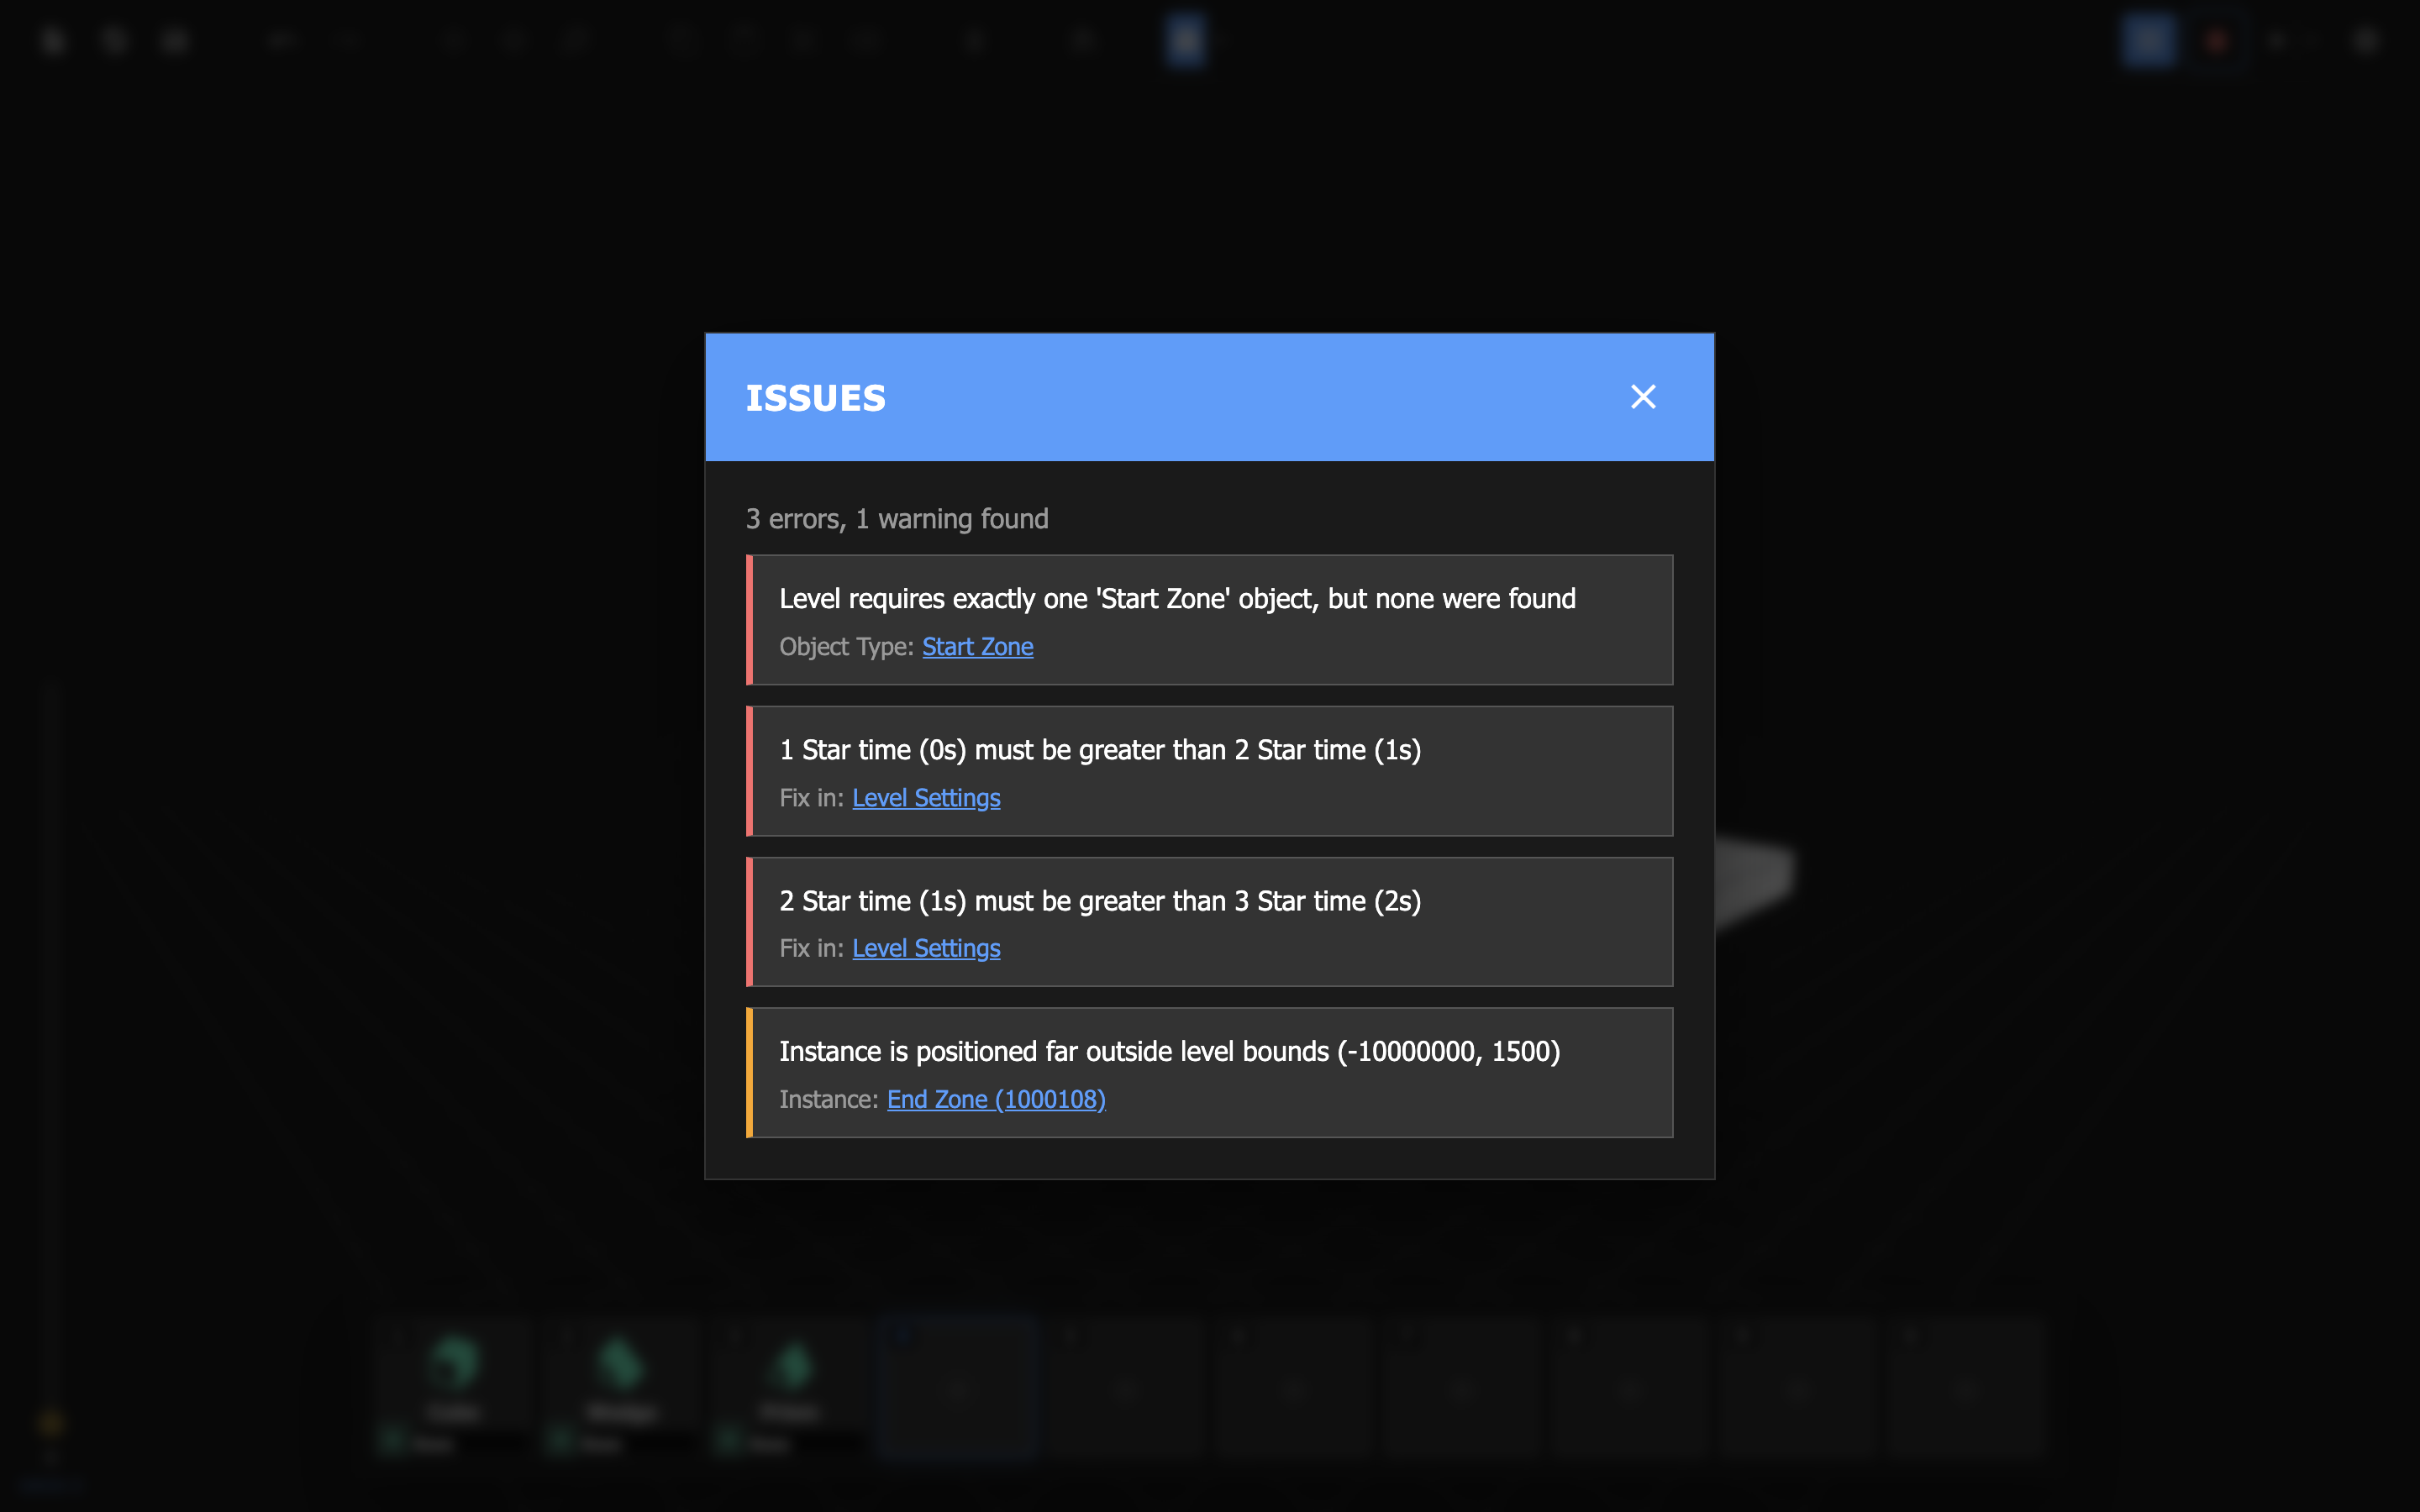
If an issue is related to a specific object type or instance, you will be able to find a reference to it linked under the issue.
Before you publish your project, consider the following:
Please note that once your project is published, your creation will represent Z-corp and you alone will be held accountable in the event of said Trials to be either impossible, unfair, or not up to our standards of quality.
Please consult the QA department before uploading to the Steam Workshop.
Navigate to the Steam Workshop menu by clicking on the Steam Workshop ![]() button from the toolbar.
button from the toolbar.
If the project is not linked to a Steam Workshop item, you will be prompted to create one.
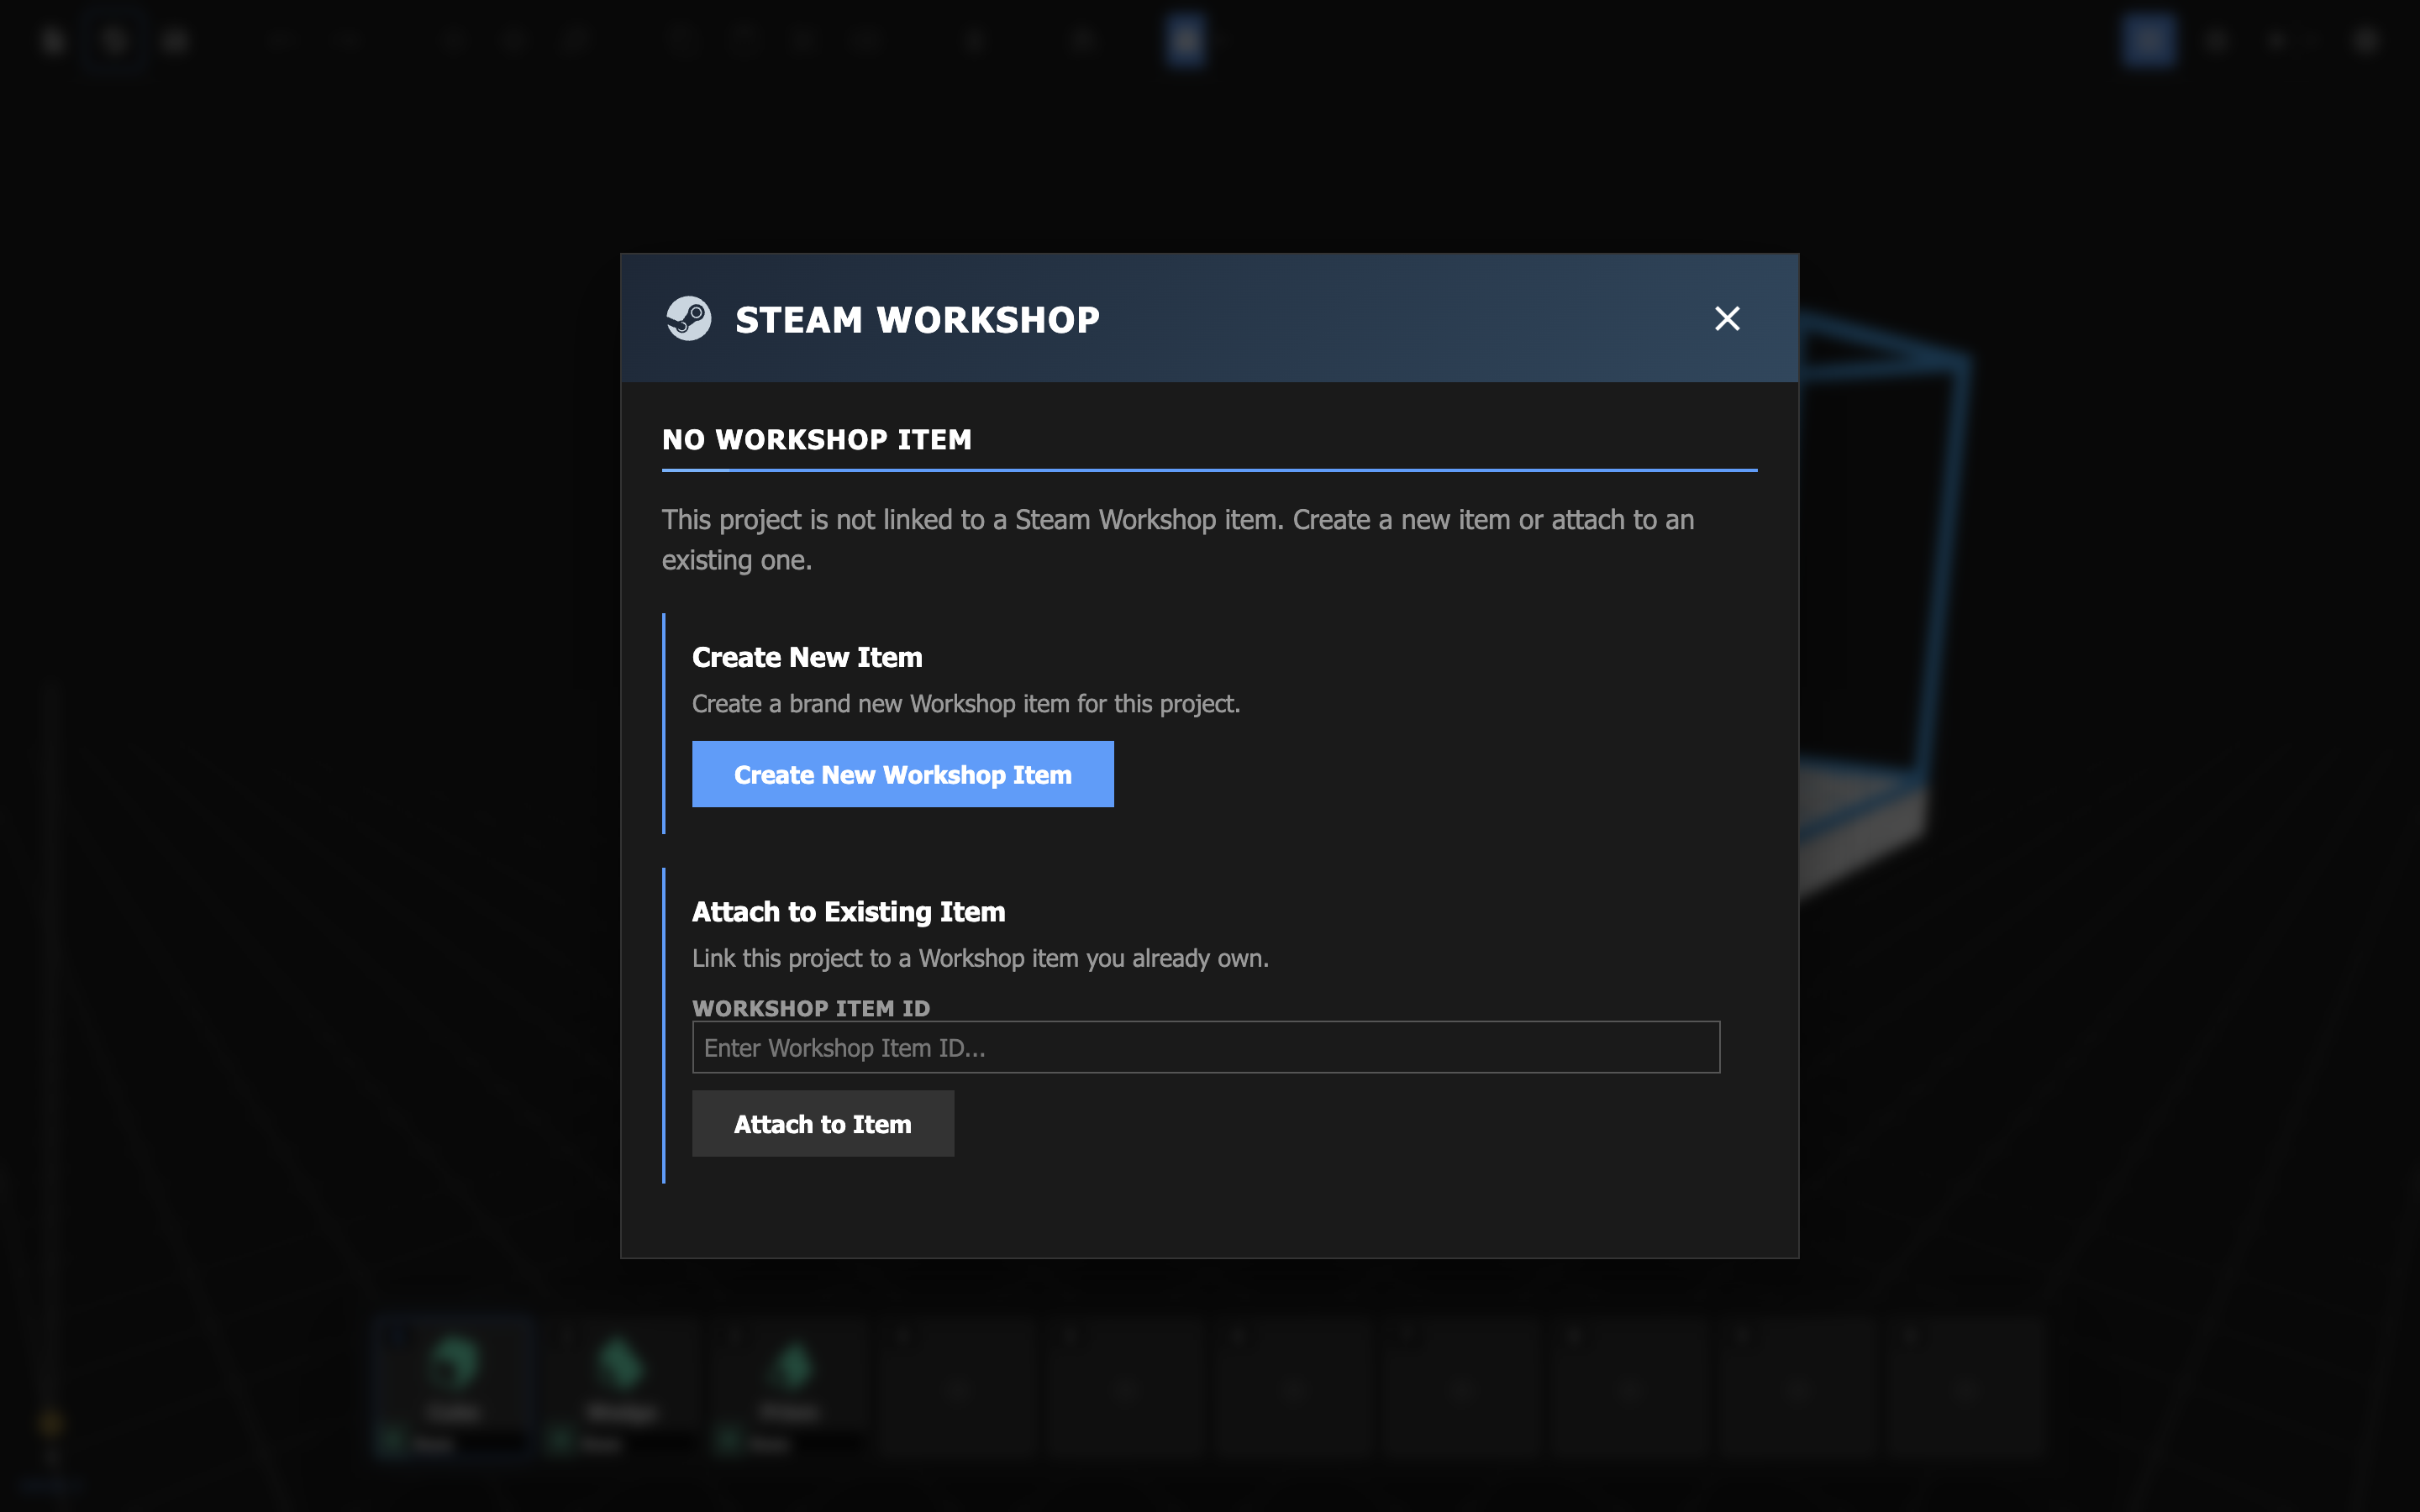
Once the item has been created, you will be able to fill out the project's metadata, including its title, preview thumbnail, difficulty level, description, and visibility.
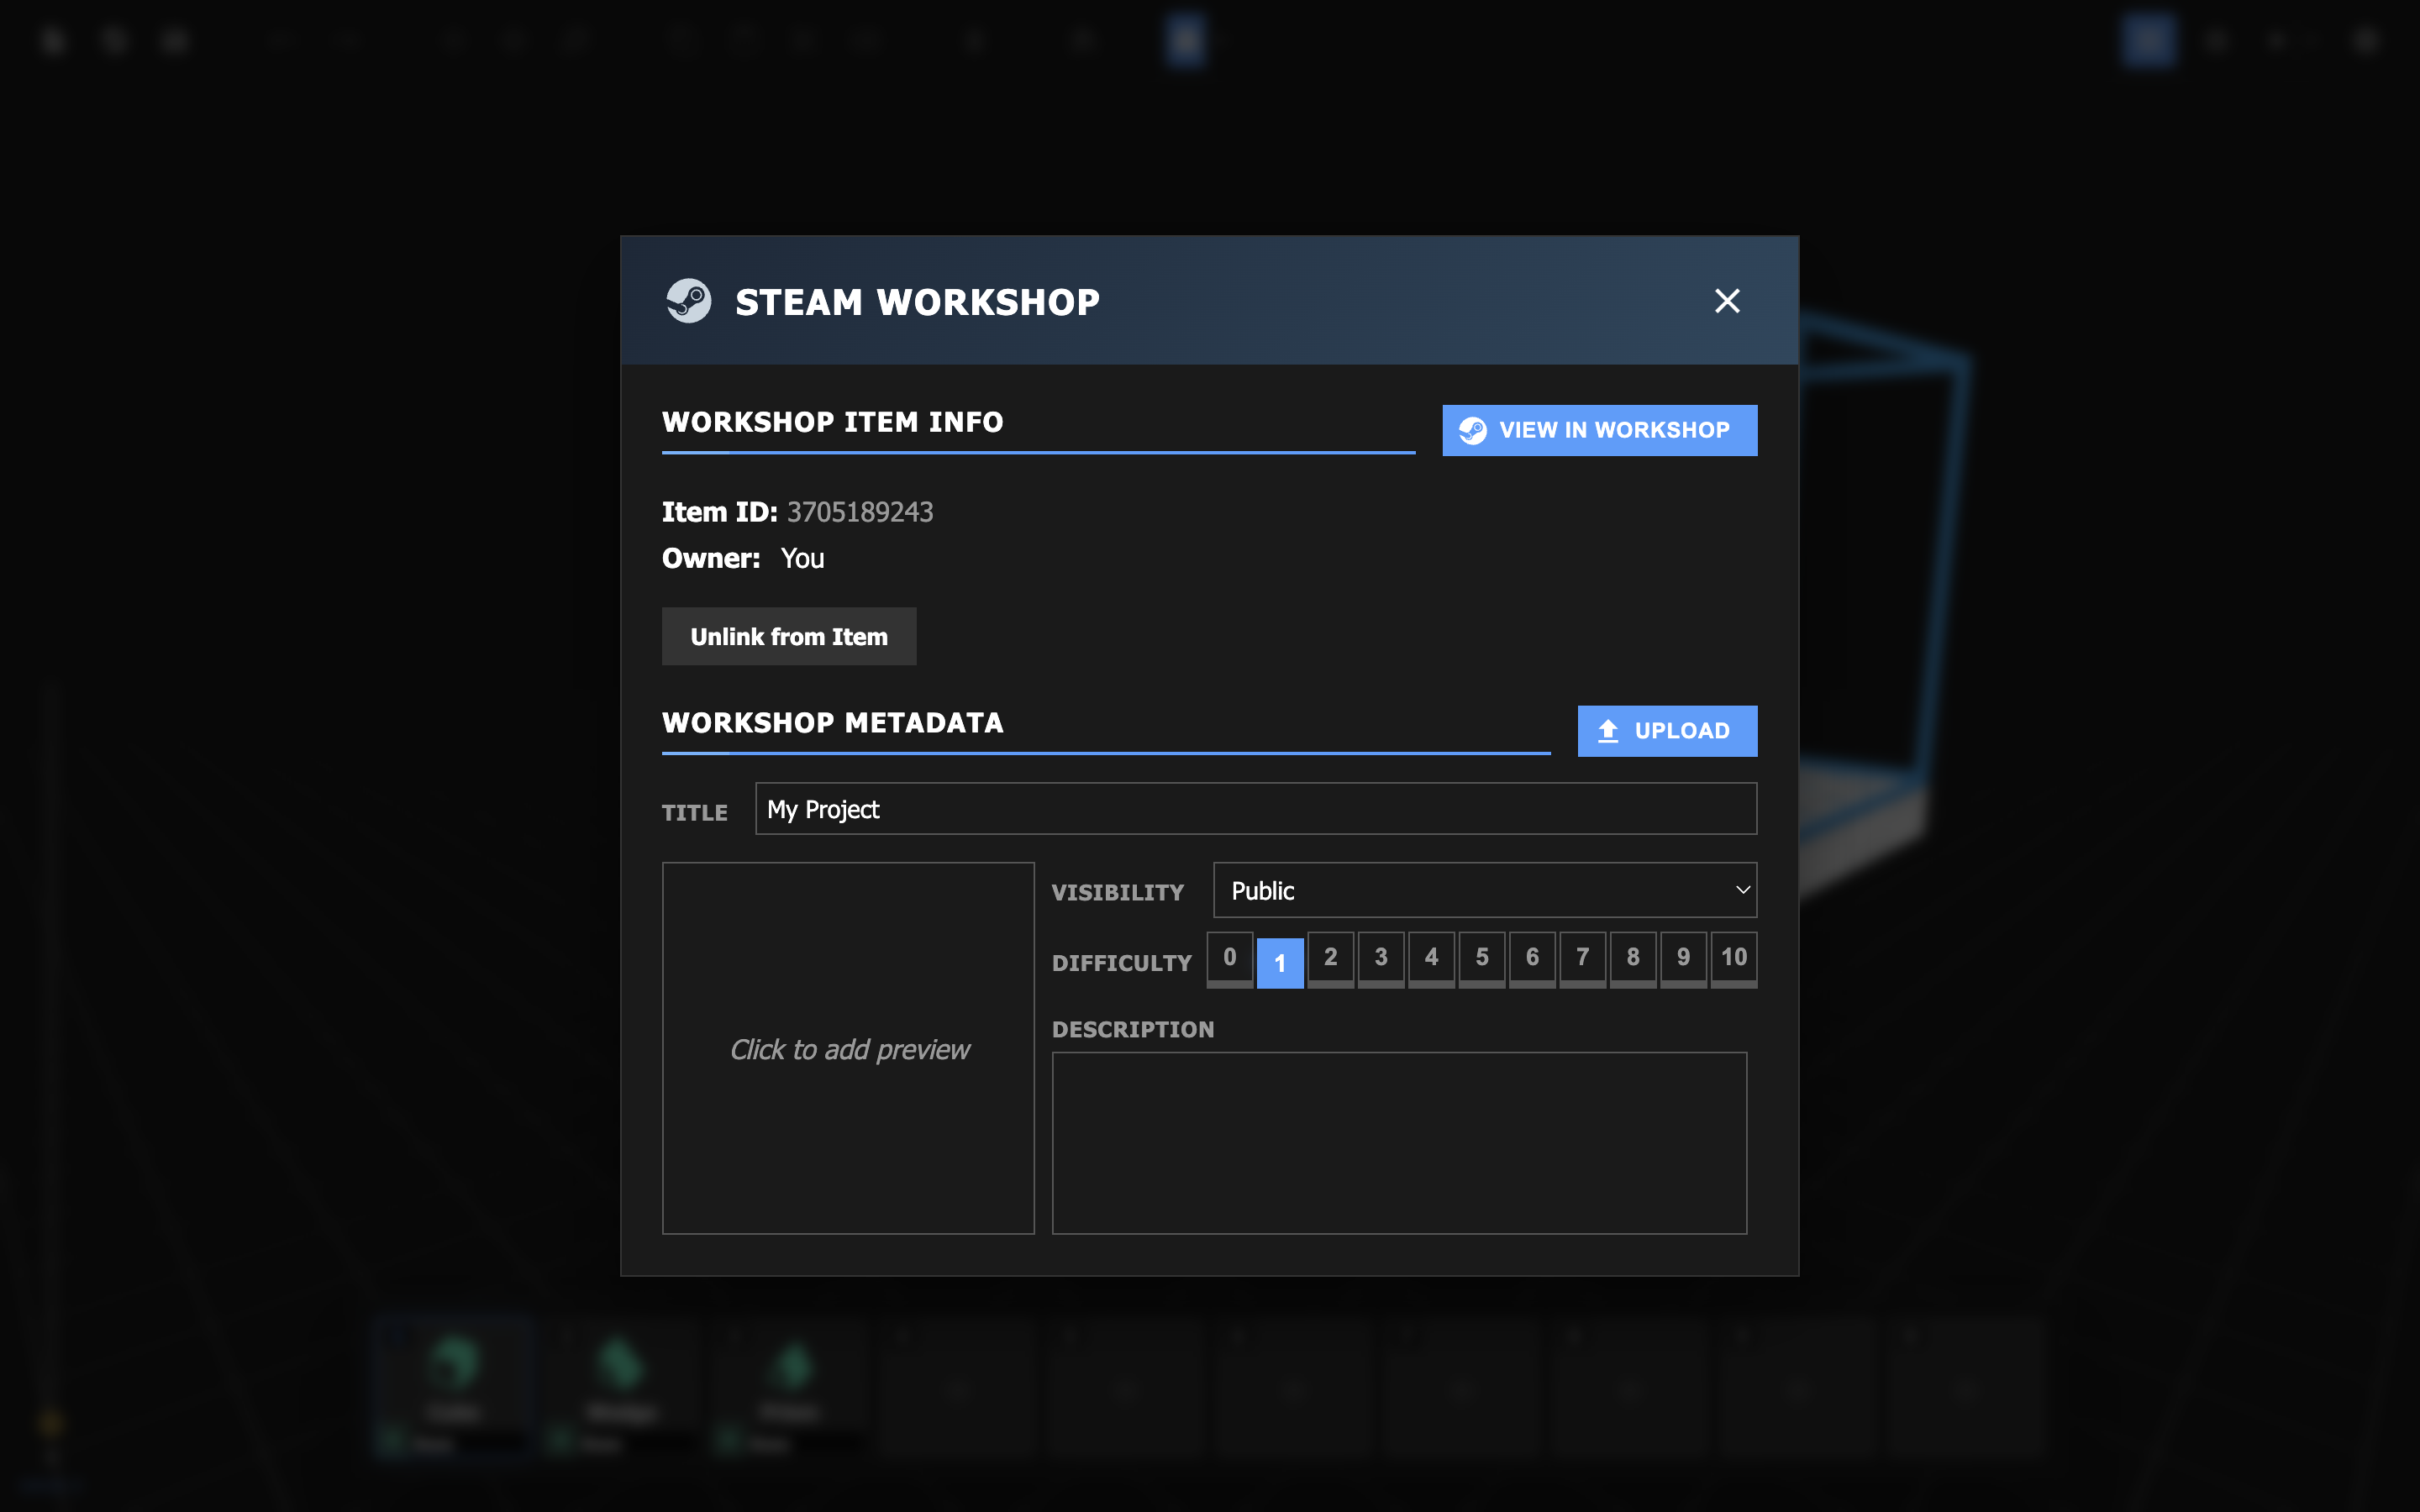
Once you've finished filling out the correct information, click the blue Upload ![]() button to publish your project. Once published, Runners around the world will immediately be able to play your project via the Workshop.
button to publish your project. Once published, Runners around the world will immediately be able to play your project via the Workshop.
The more complex capabilities of our level editor.
A single project can contain multiple levels. Runners will move through these levels in sequence.
You can add, manage, and open levels from the Project Manager.
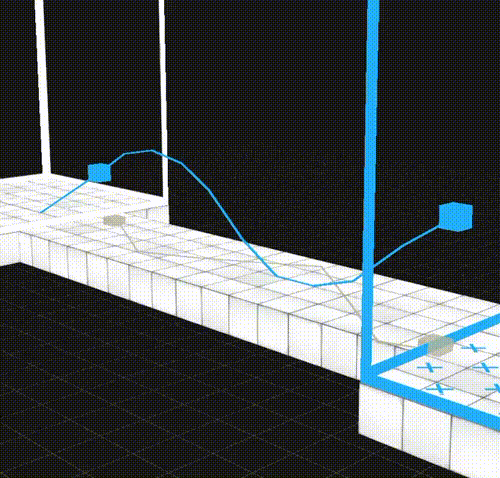
When you've played through a level, you will be provided with a visualization of the path you took within the editor. This visual is called a "ghost path." Ghost paths can be played in order to analyze real-time movement. All relevant settings can be found in the toolbar next to the Toggle Ghost Visibility ![]() button.
button.
In every level, stars can be awarded for efficient traversal. In the Level Settings menu, you can set the minimum required completion time to earn up to 4 stars. If you assign a time of 0 seconds to a star, that star will not be available.
Make sure to set star times that are achievable and rewarding.
Structures are preset object groups. They can be useful for defining and instantiating custom objects per project.
You can create custom structures by first selecting 1 or more objects and then clicking on the Create Custom Structure ![]() button in the toolbar.
button in the toolbar.
You can manage your custom structures by navigating to Project Manager > Resources > Structures.
Several object presets have what we call a variable parameter, a value that can be set before object instantiation by right-clicking the preset in the object tray. This will allow you to set the parameter of an object before you place it in the scene.
When creating a custom structure, you can choose to add a variable parameter. Value changes on variable parameters will apply to every object within the structure.
Why can't I find the variable I want?
Some objects, such as Start Zone or Secret, have limited or no parameterable variables. If you can't find the variable you're looking for, chances are the object(s) you're using doesn't support it.
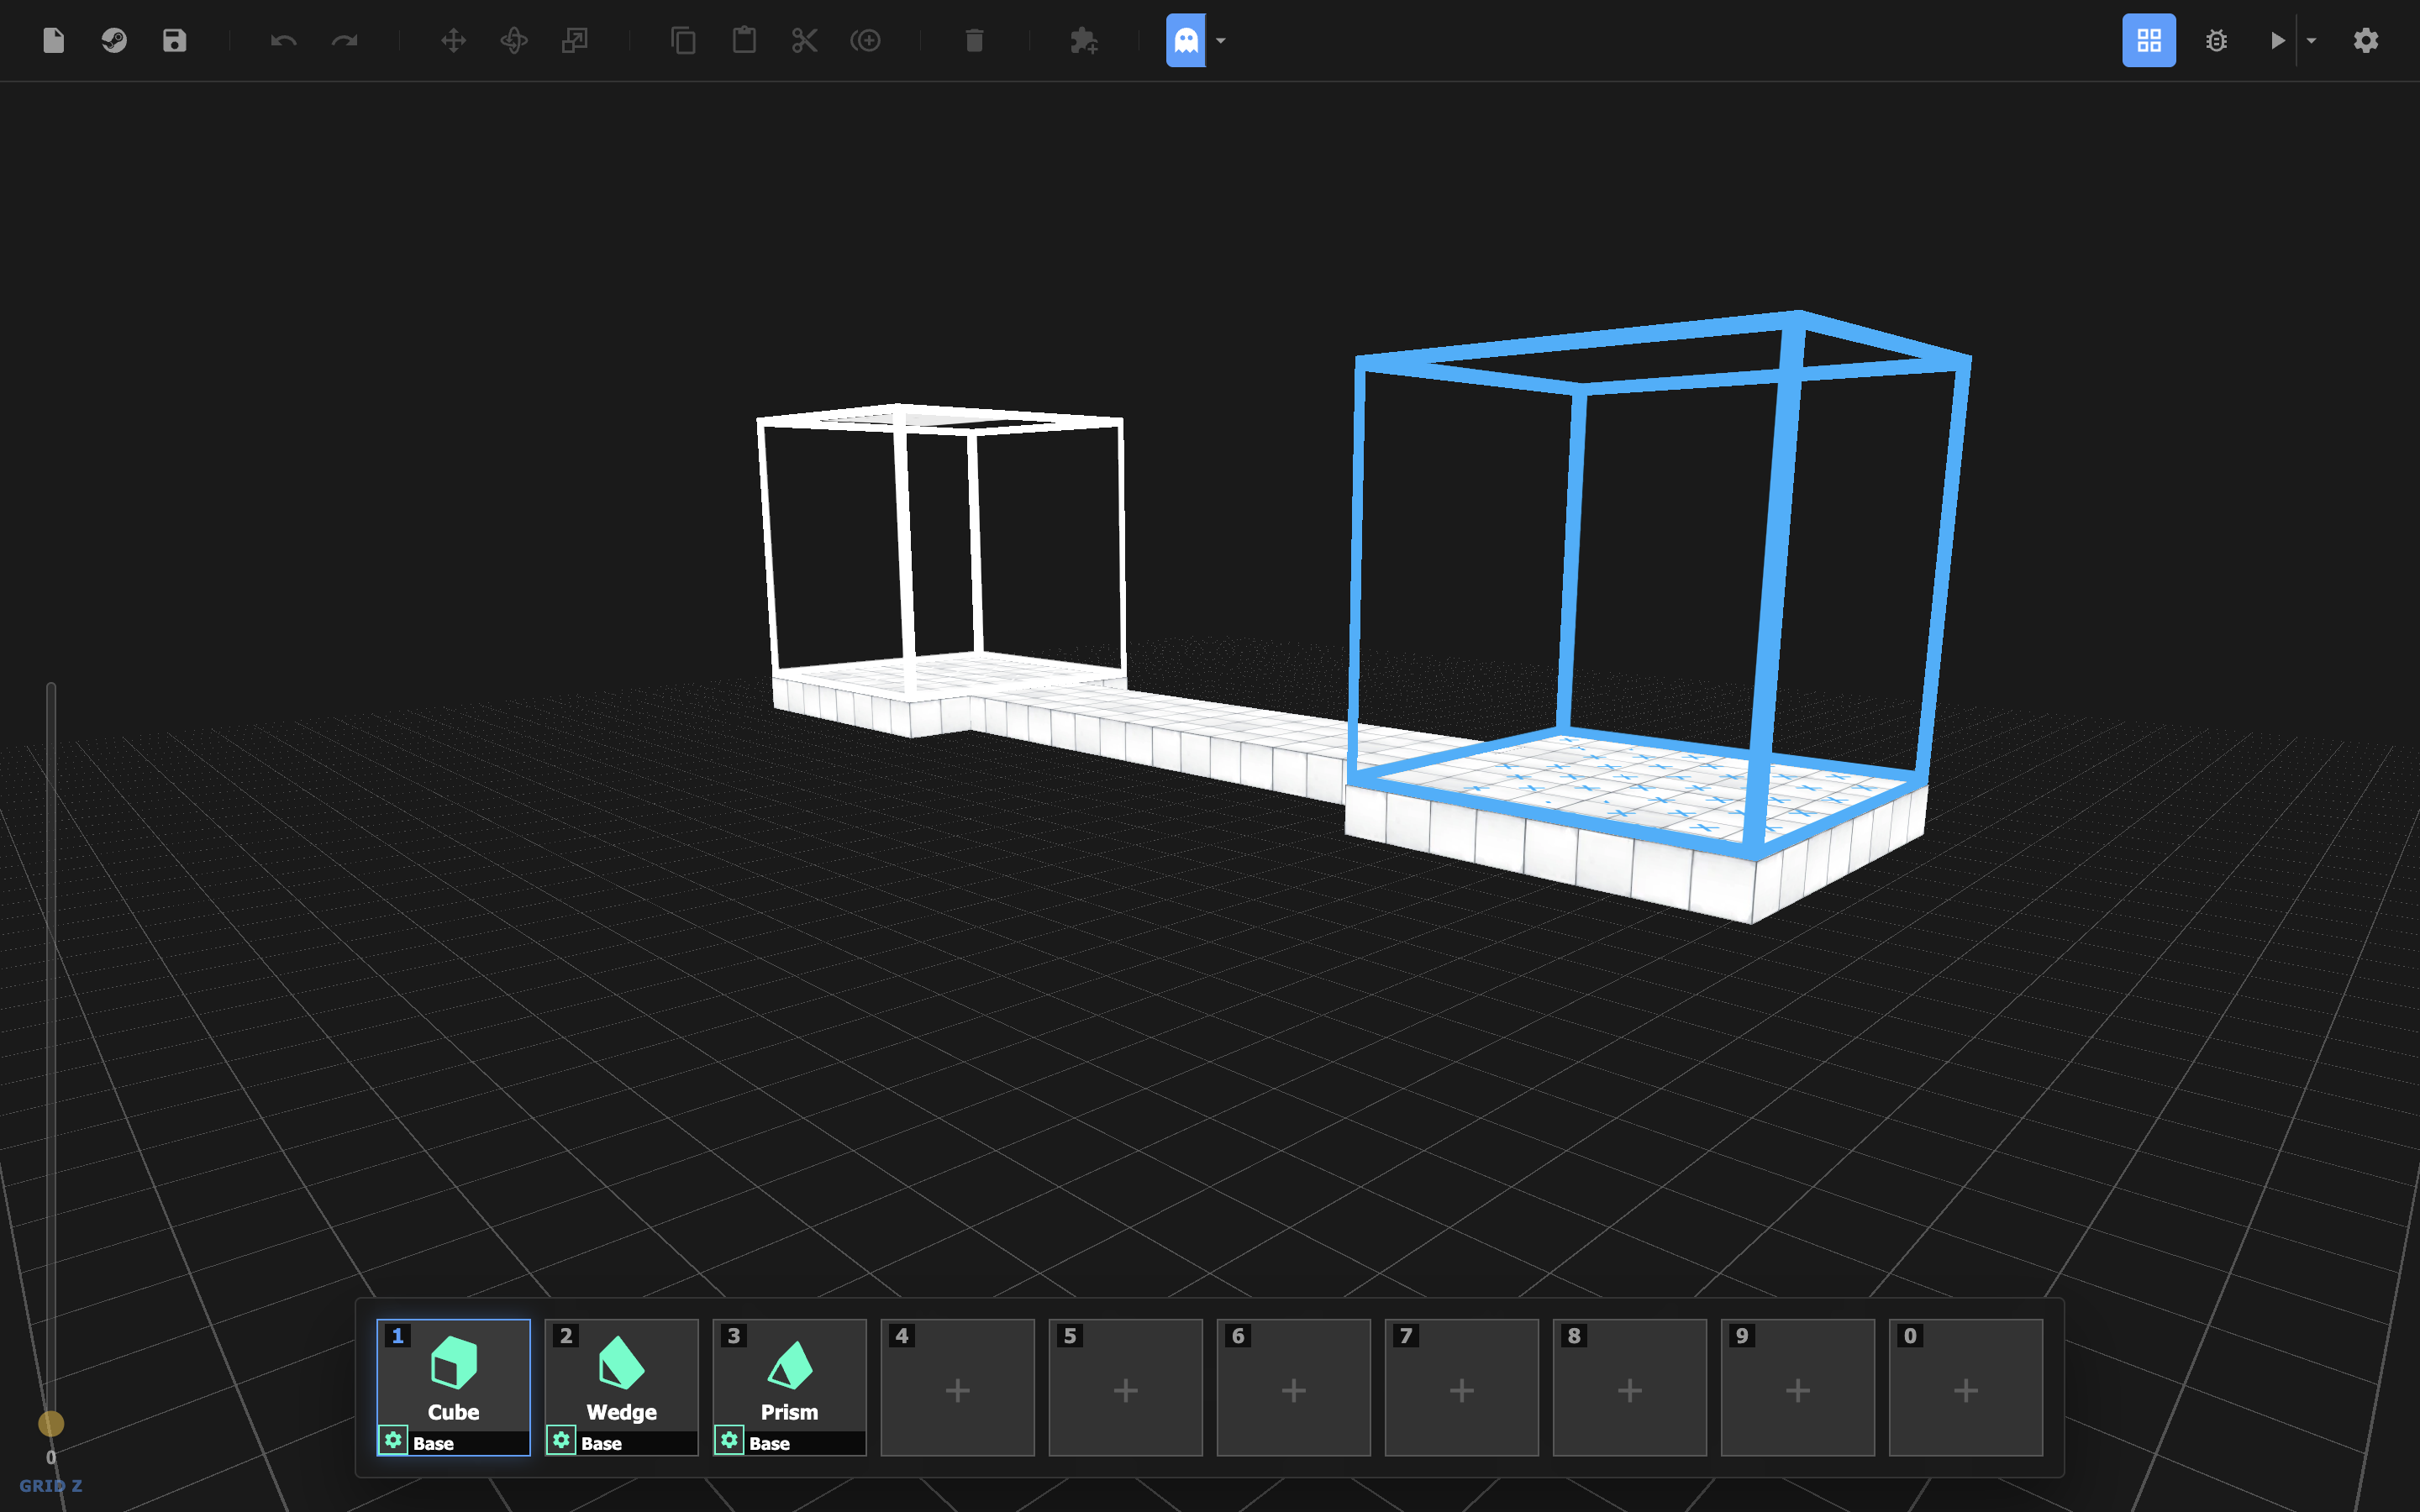
Picture a scenario in which a Builder must design a level set in a town with many small houses. It would be useful for this Builder to define a custom "house" structure so that they can easily place several of these houses.
First, the Builder begins by creating the structure within the scene. They decide to create a house using the Prism and Cube shape objects.
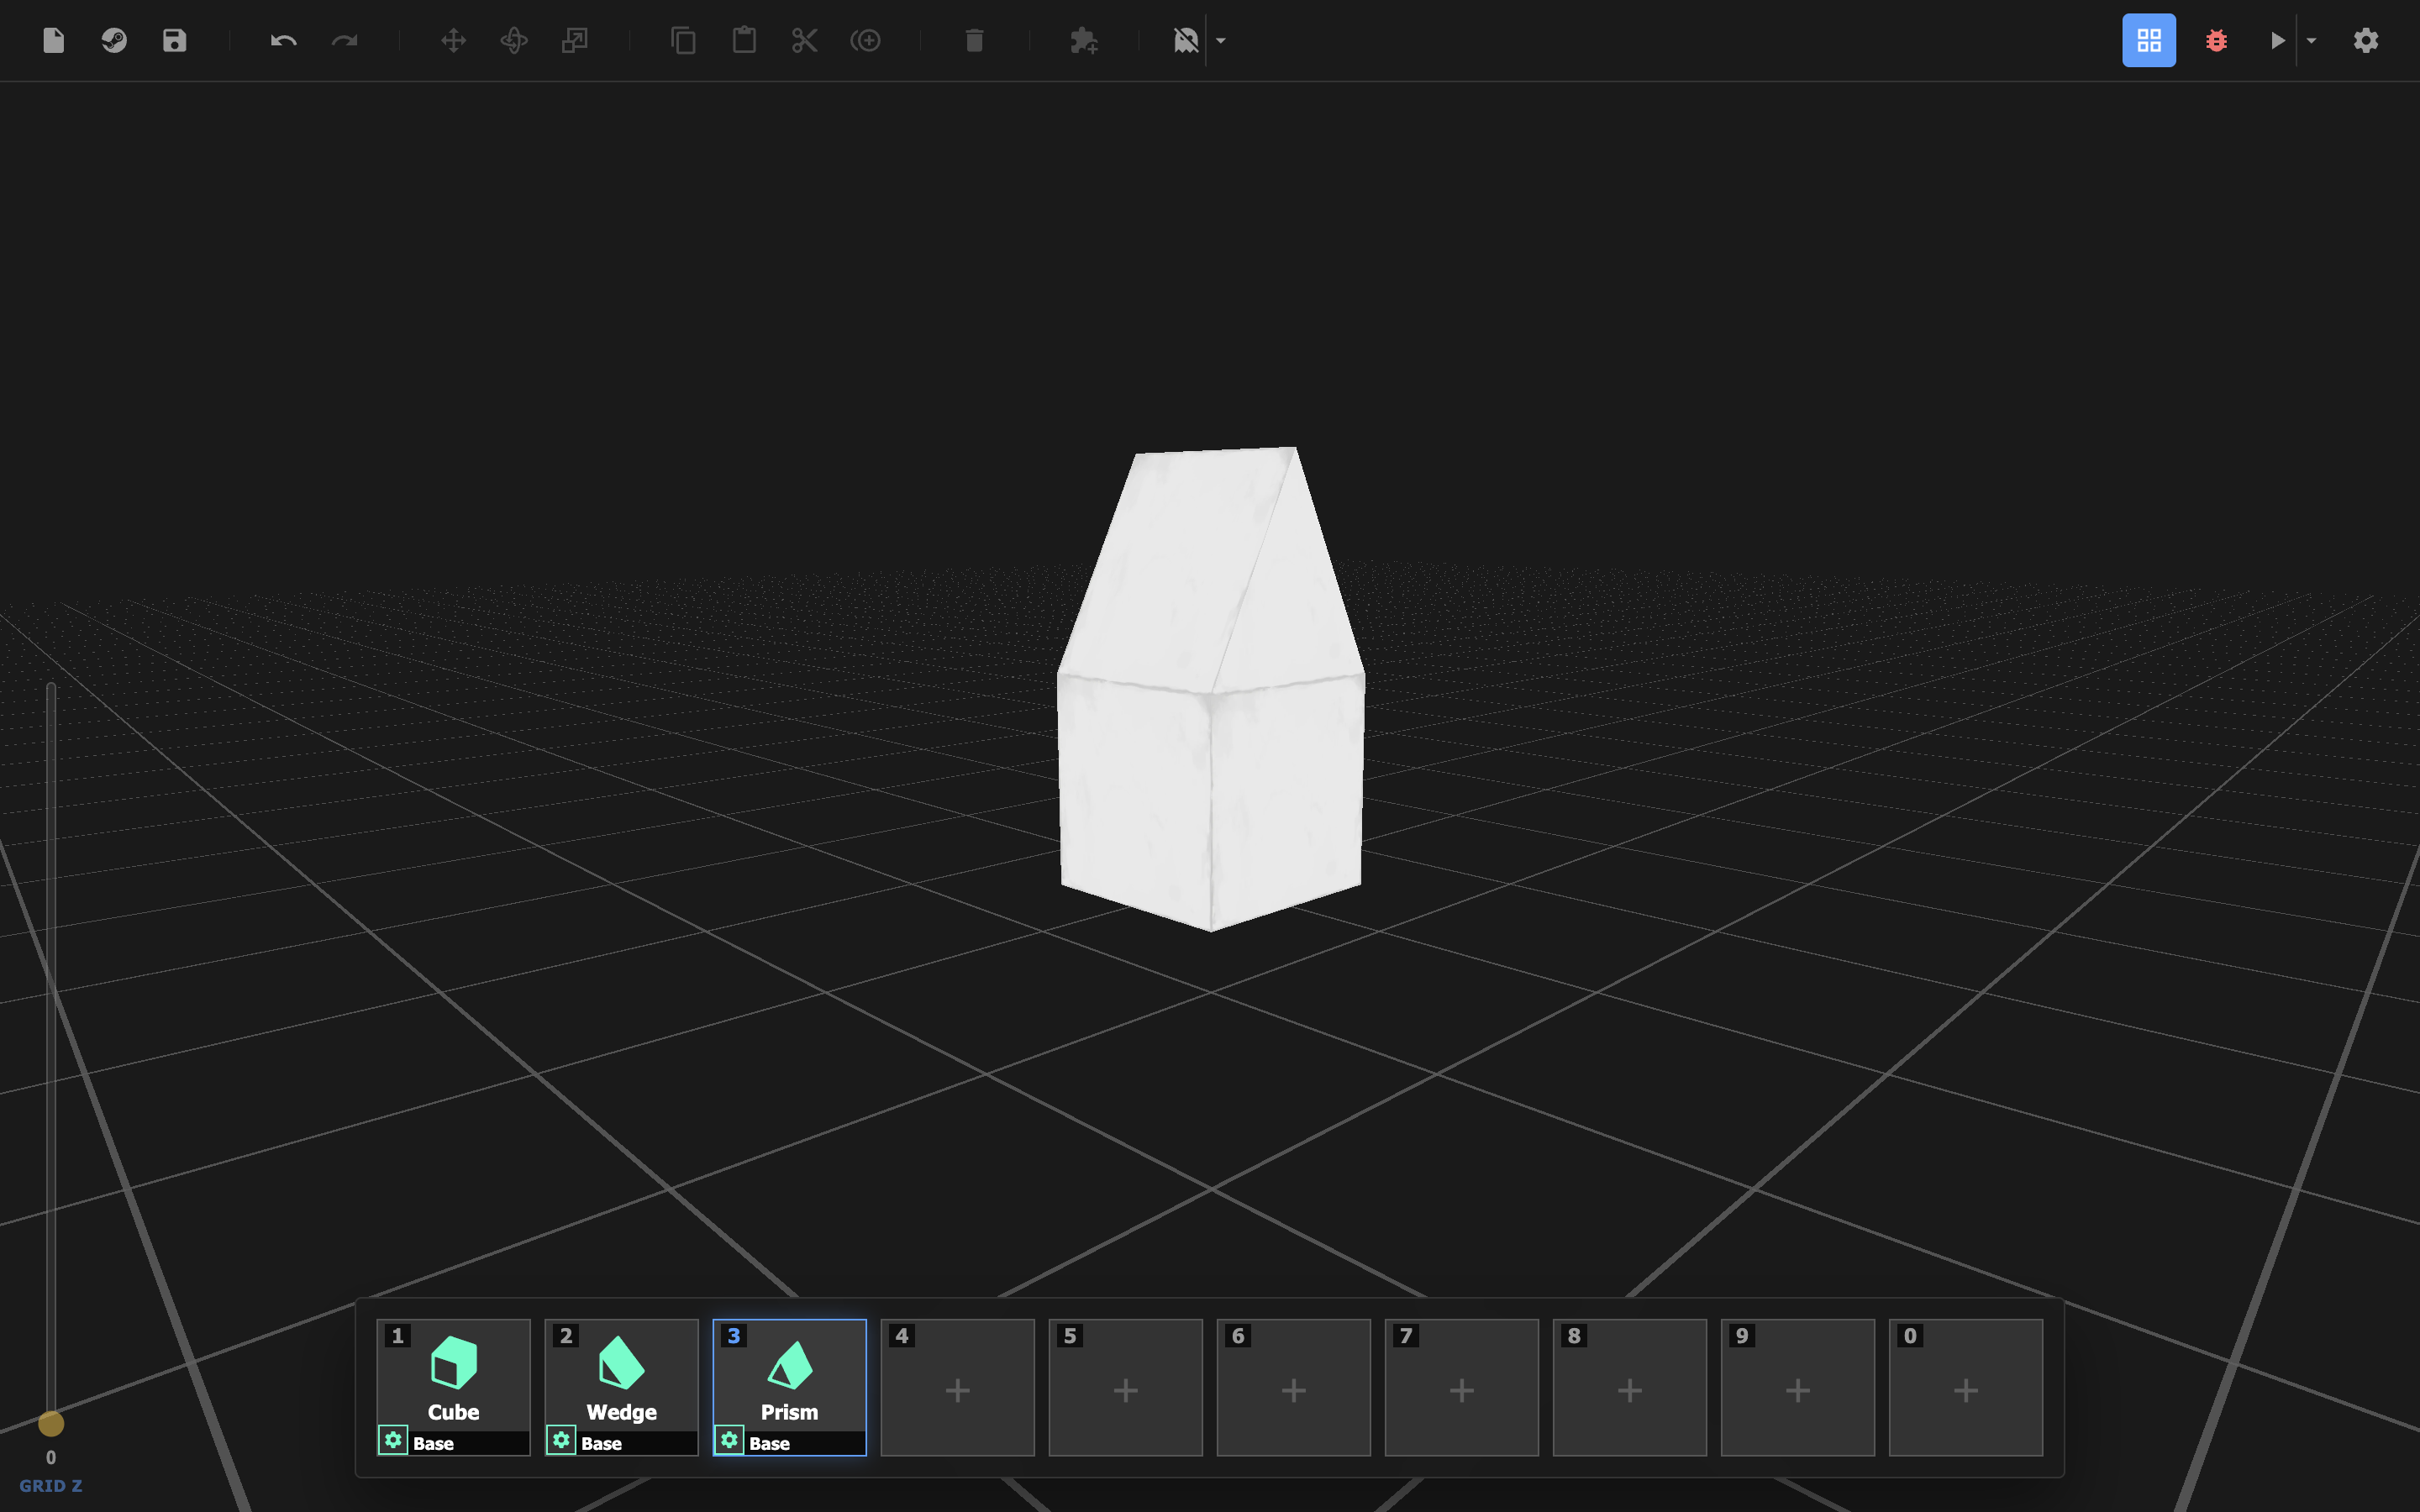
Next, the Builder selects all the objects that make up the house before clicking on the Create Custom Structure ![]() button.
button.
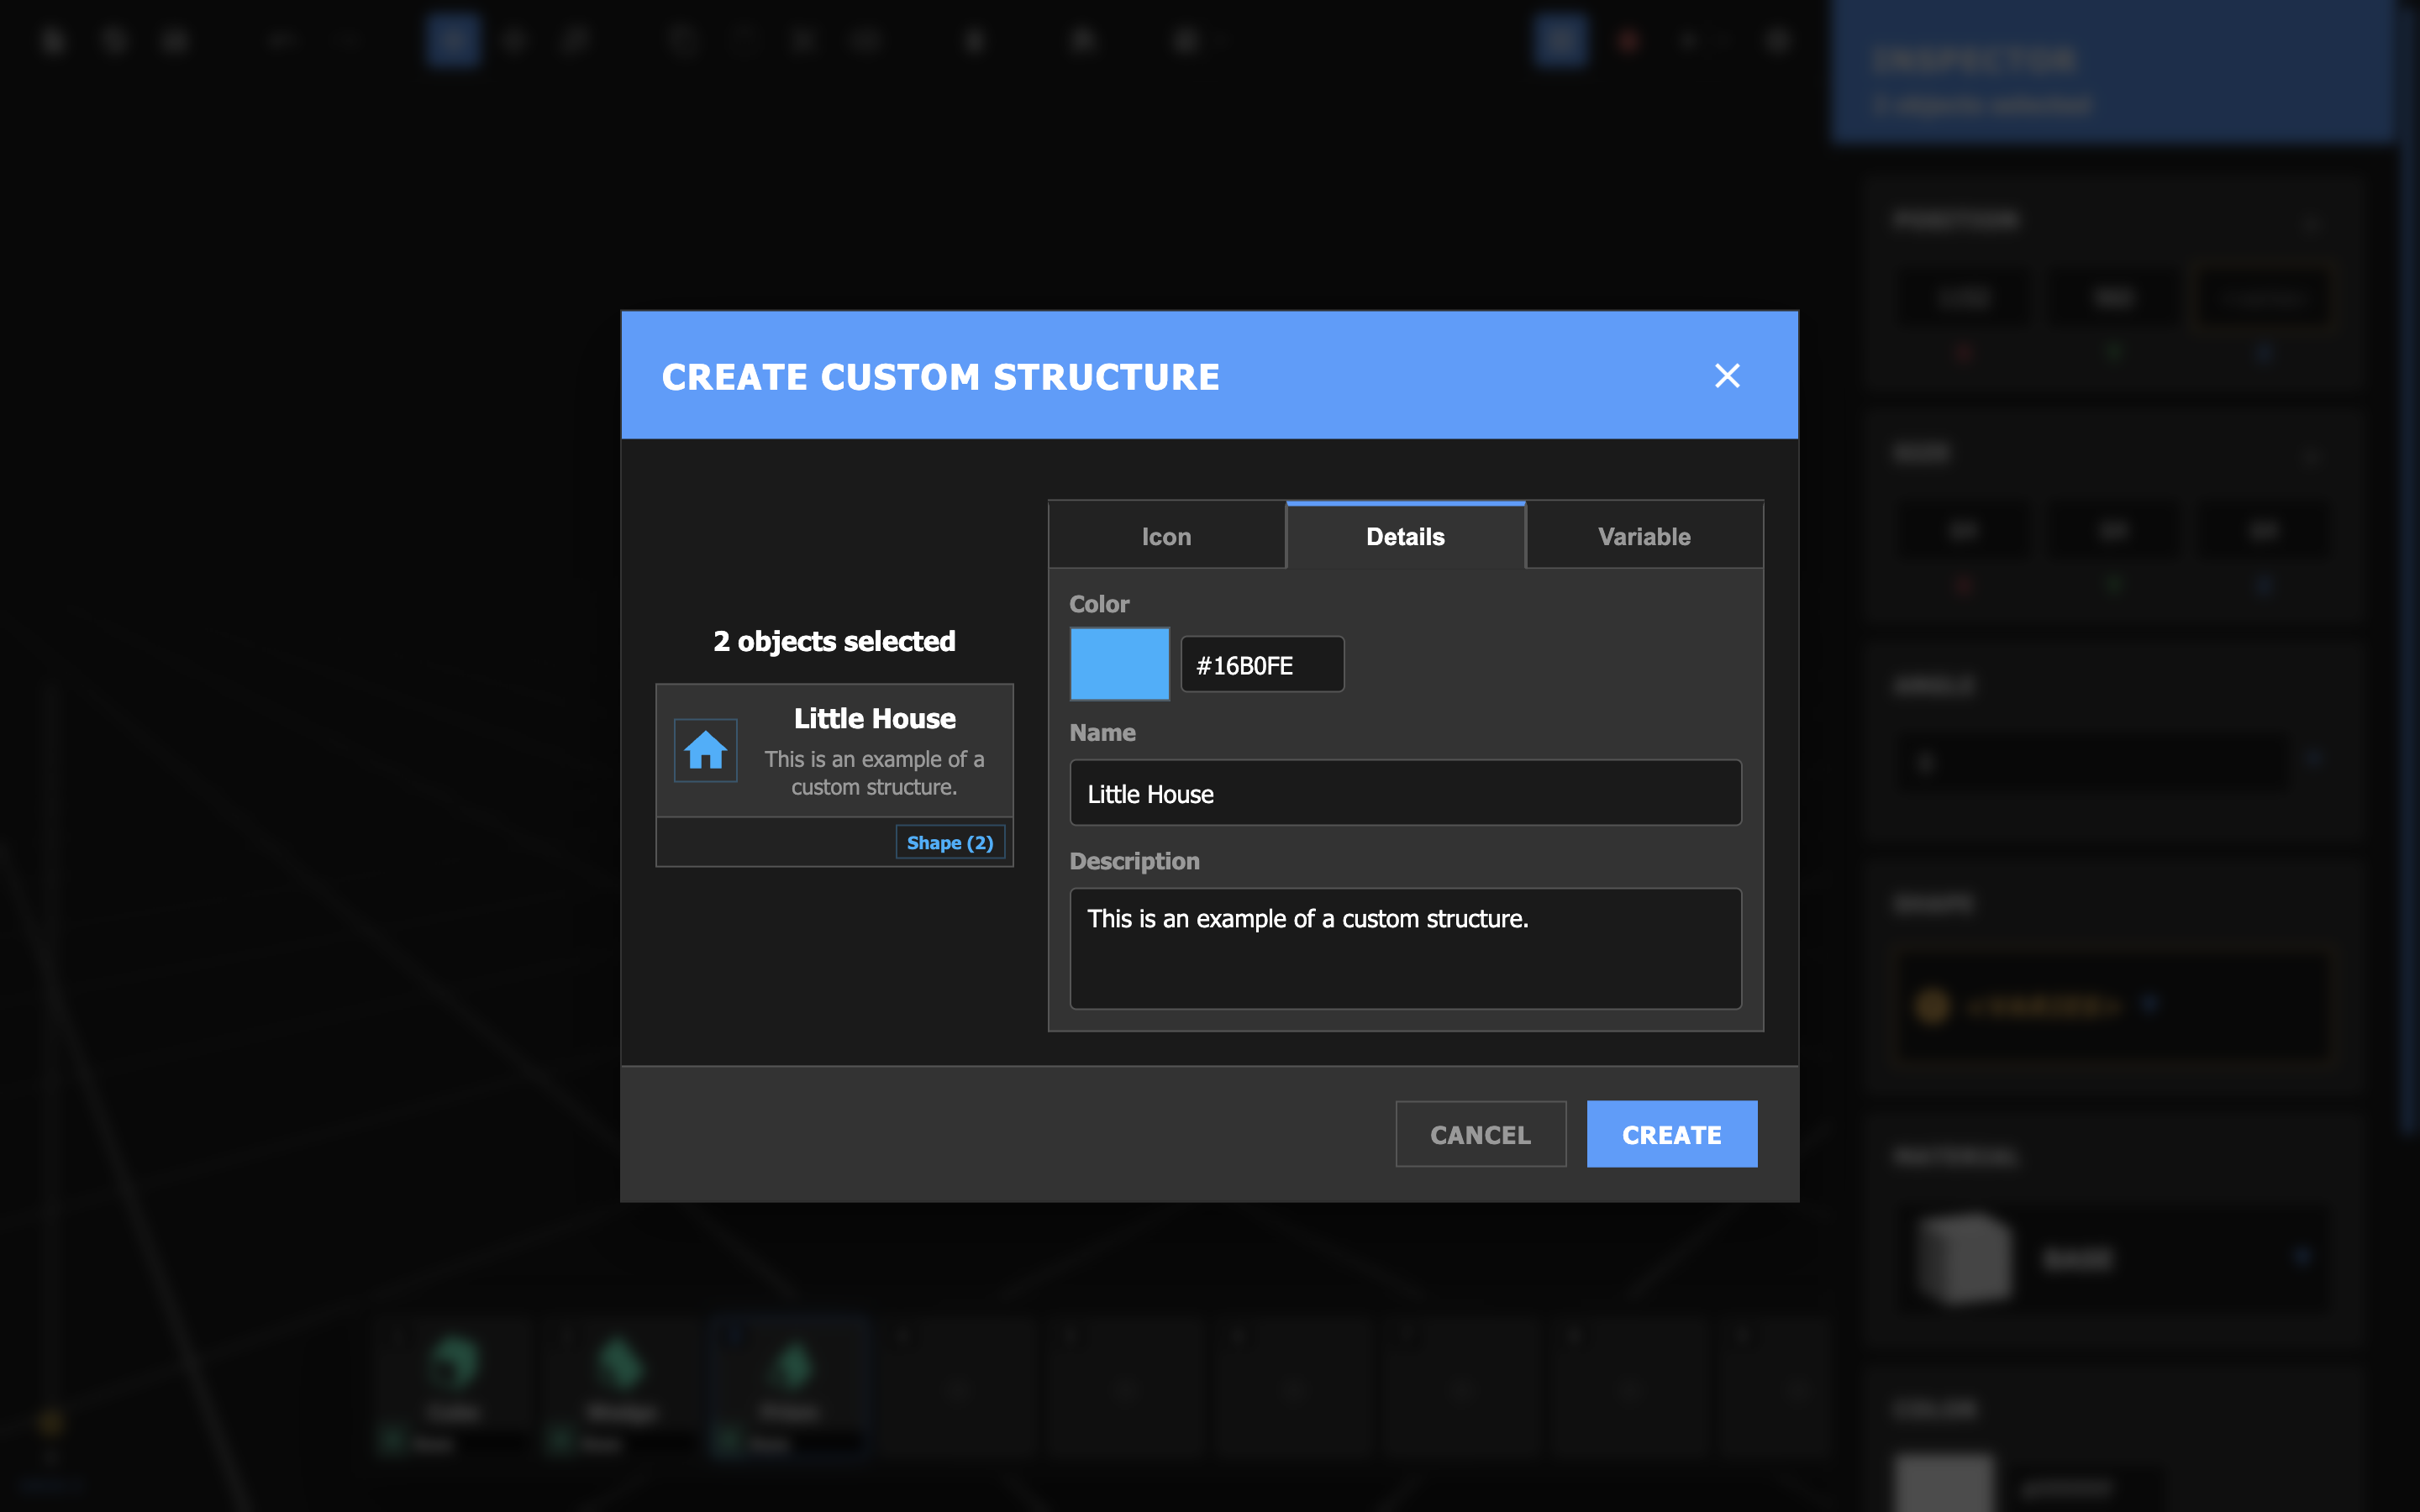
The Builder fills out the information for this structure and decides that they want to set a variable Color parameter so that they can easily create different colored versions of this house.
Once they click Create, they are able to find the preset within the Object Preset menu under Custom Structures.
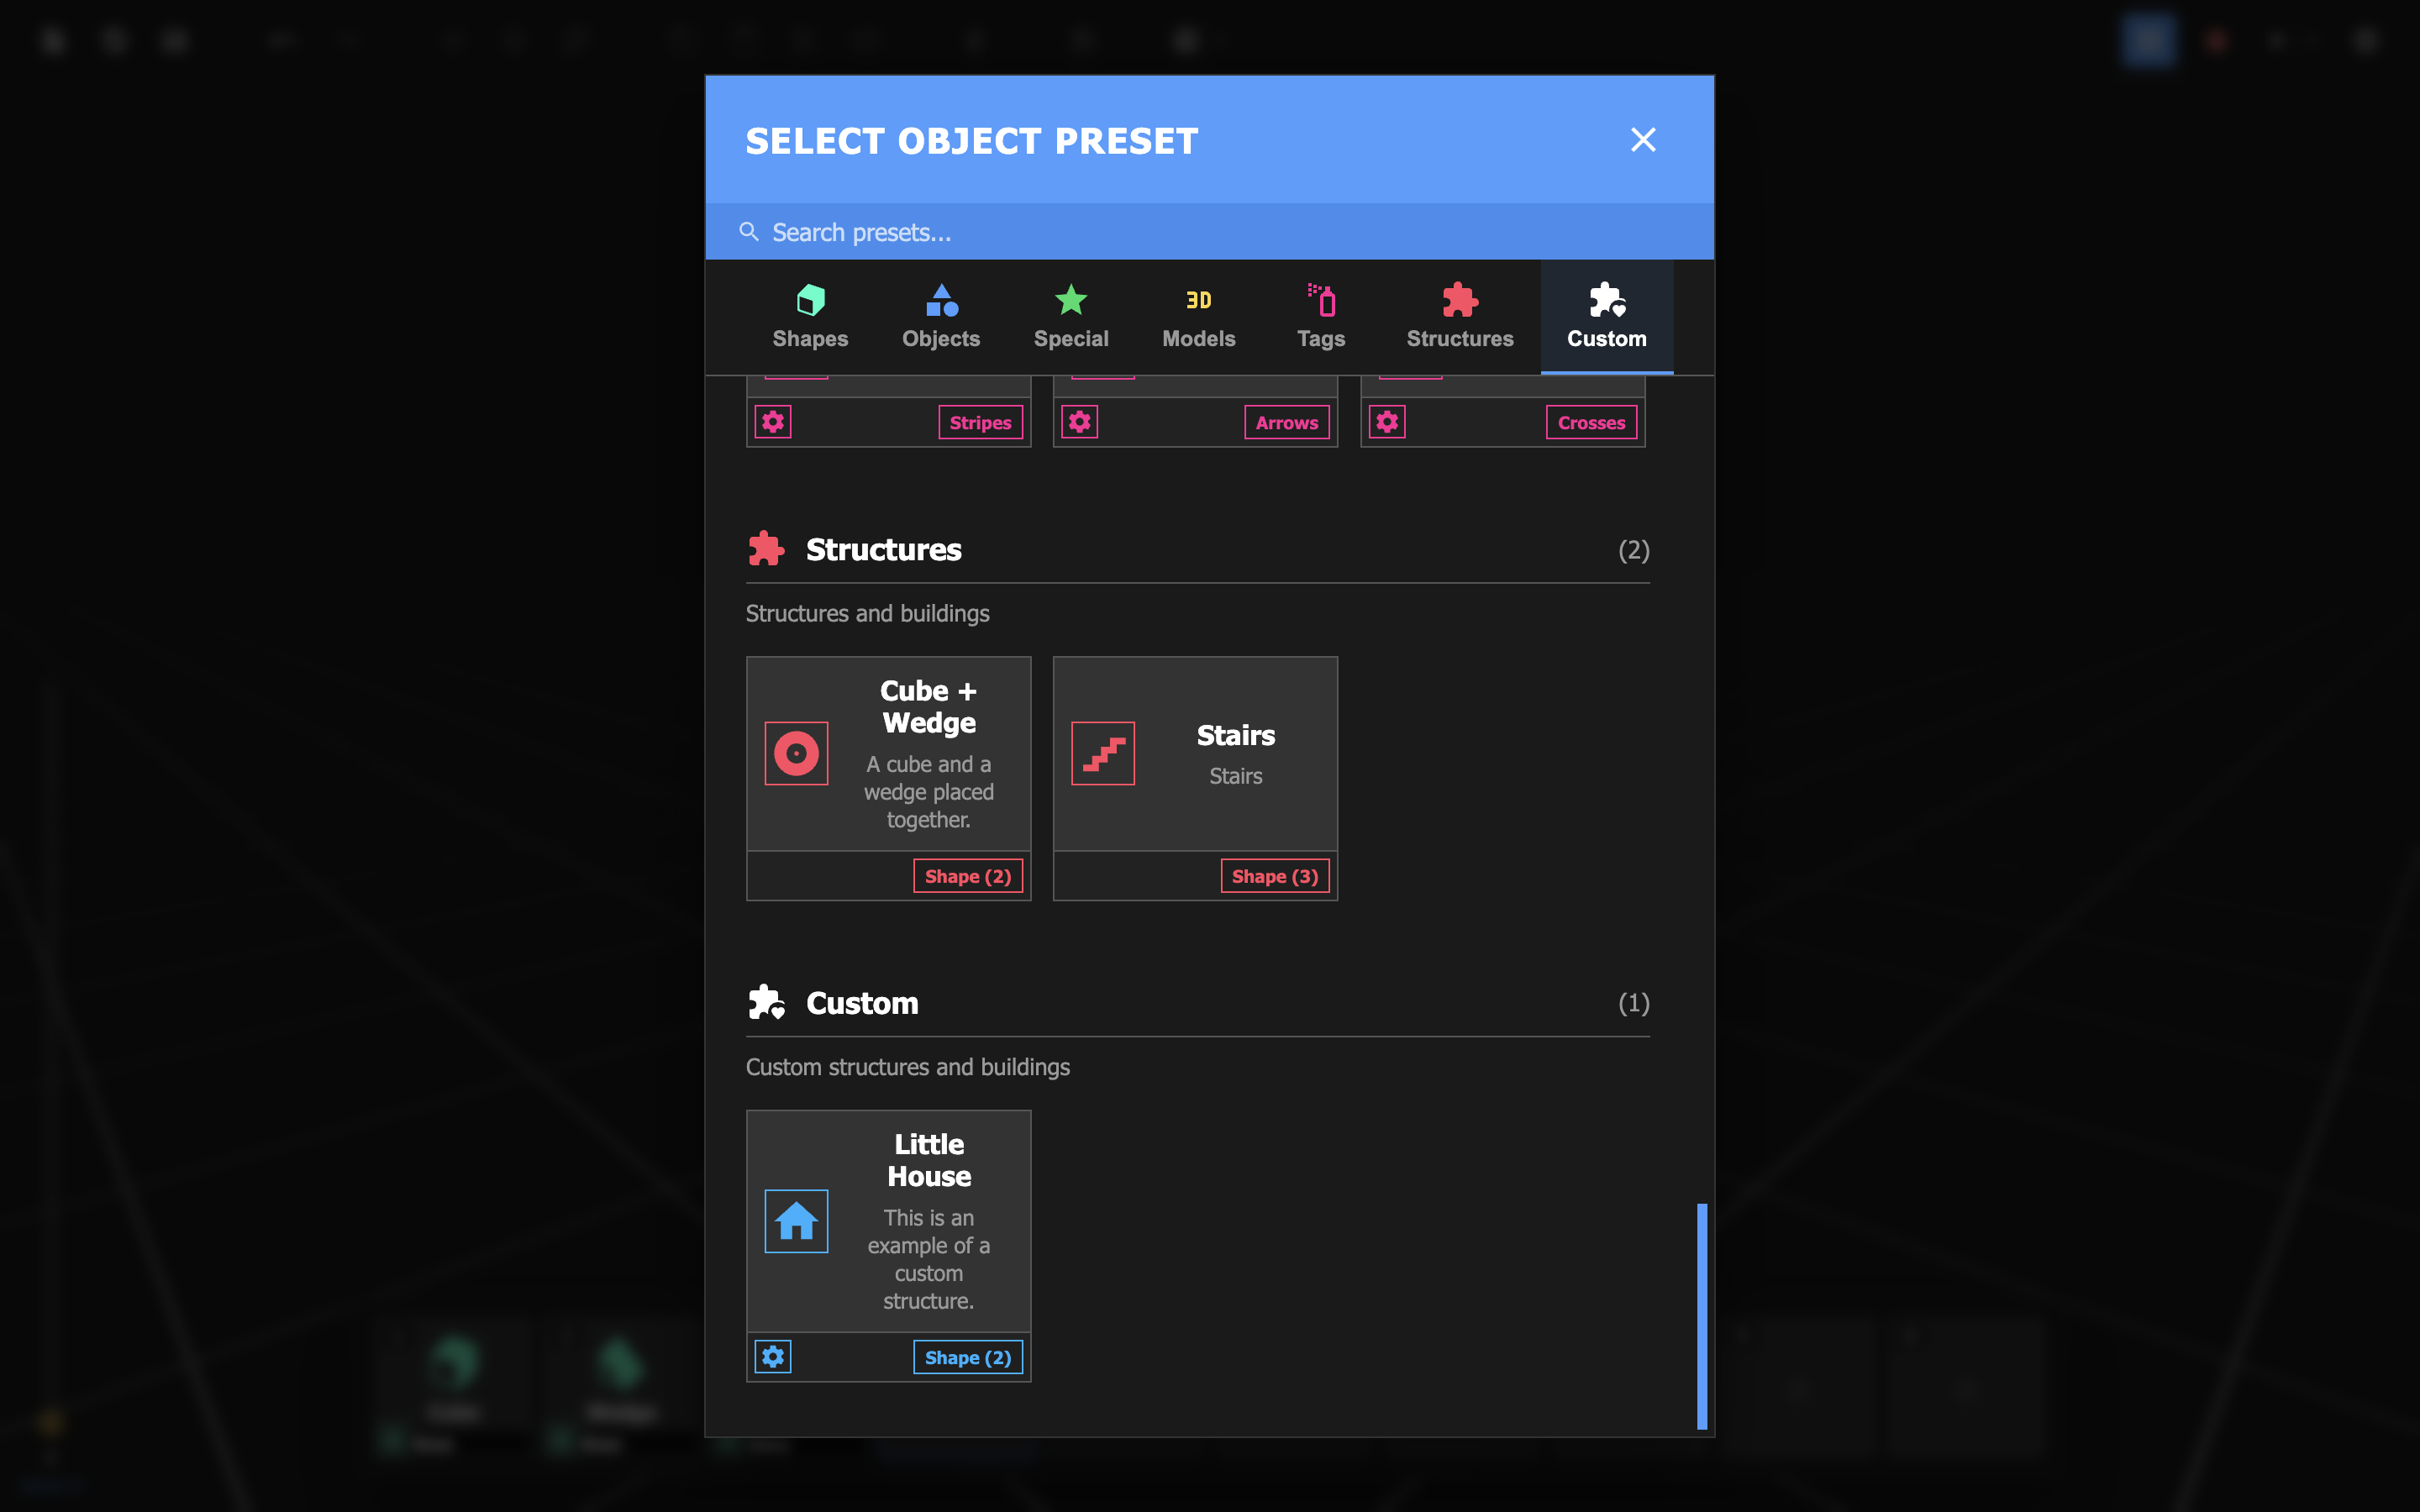
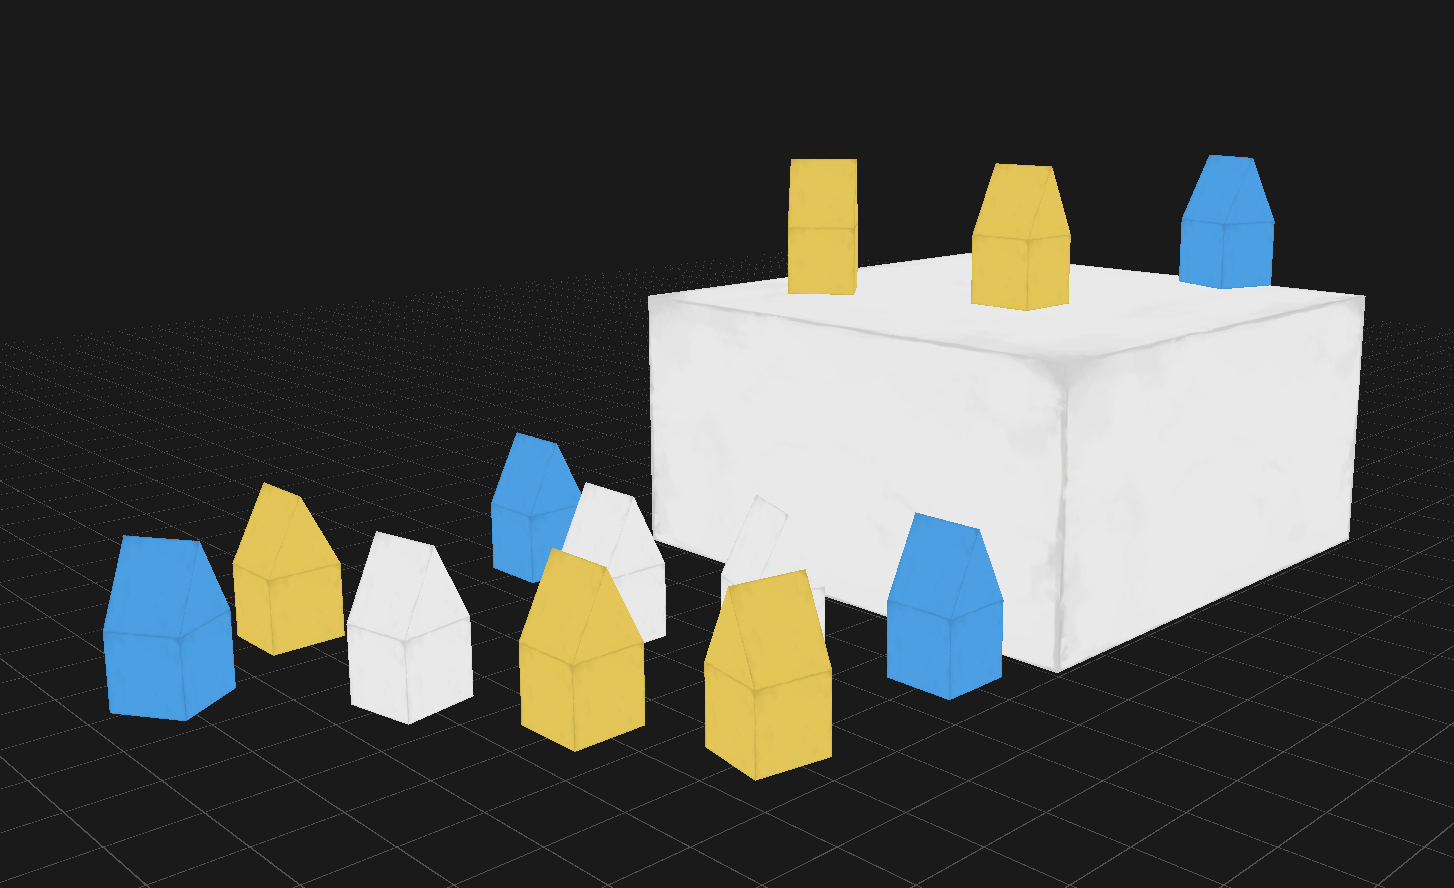
Now they can place this house structure like any other object preset.
Every detail, even those that don't directly affect the geography of a level, can have an impact on a Runner's experience. This is why the Z-corp™ proprietary Level Editor™ provides tools to change even the color of the sky if a Builder deems it necessary.
Skybox, sky color, fog color, and fog density are all values that can be set in the Level Settings menu.
You can change the level music in the Level Settings menu under General Settings > Level Playlist. Choose from our selection of Z-corp approved Playlists™.
"QUOTE"
The camera allows you to view and move around the scene. Use your keyboard to control the camera.
The Color Palette Manager lets you set custom colors used in the Editor's color pickers.
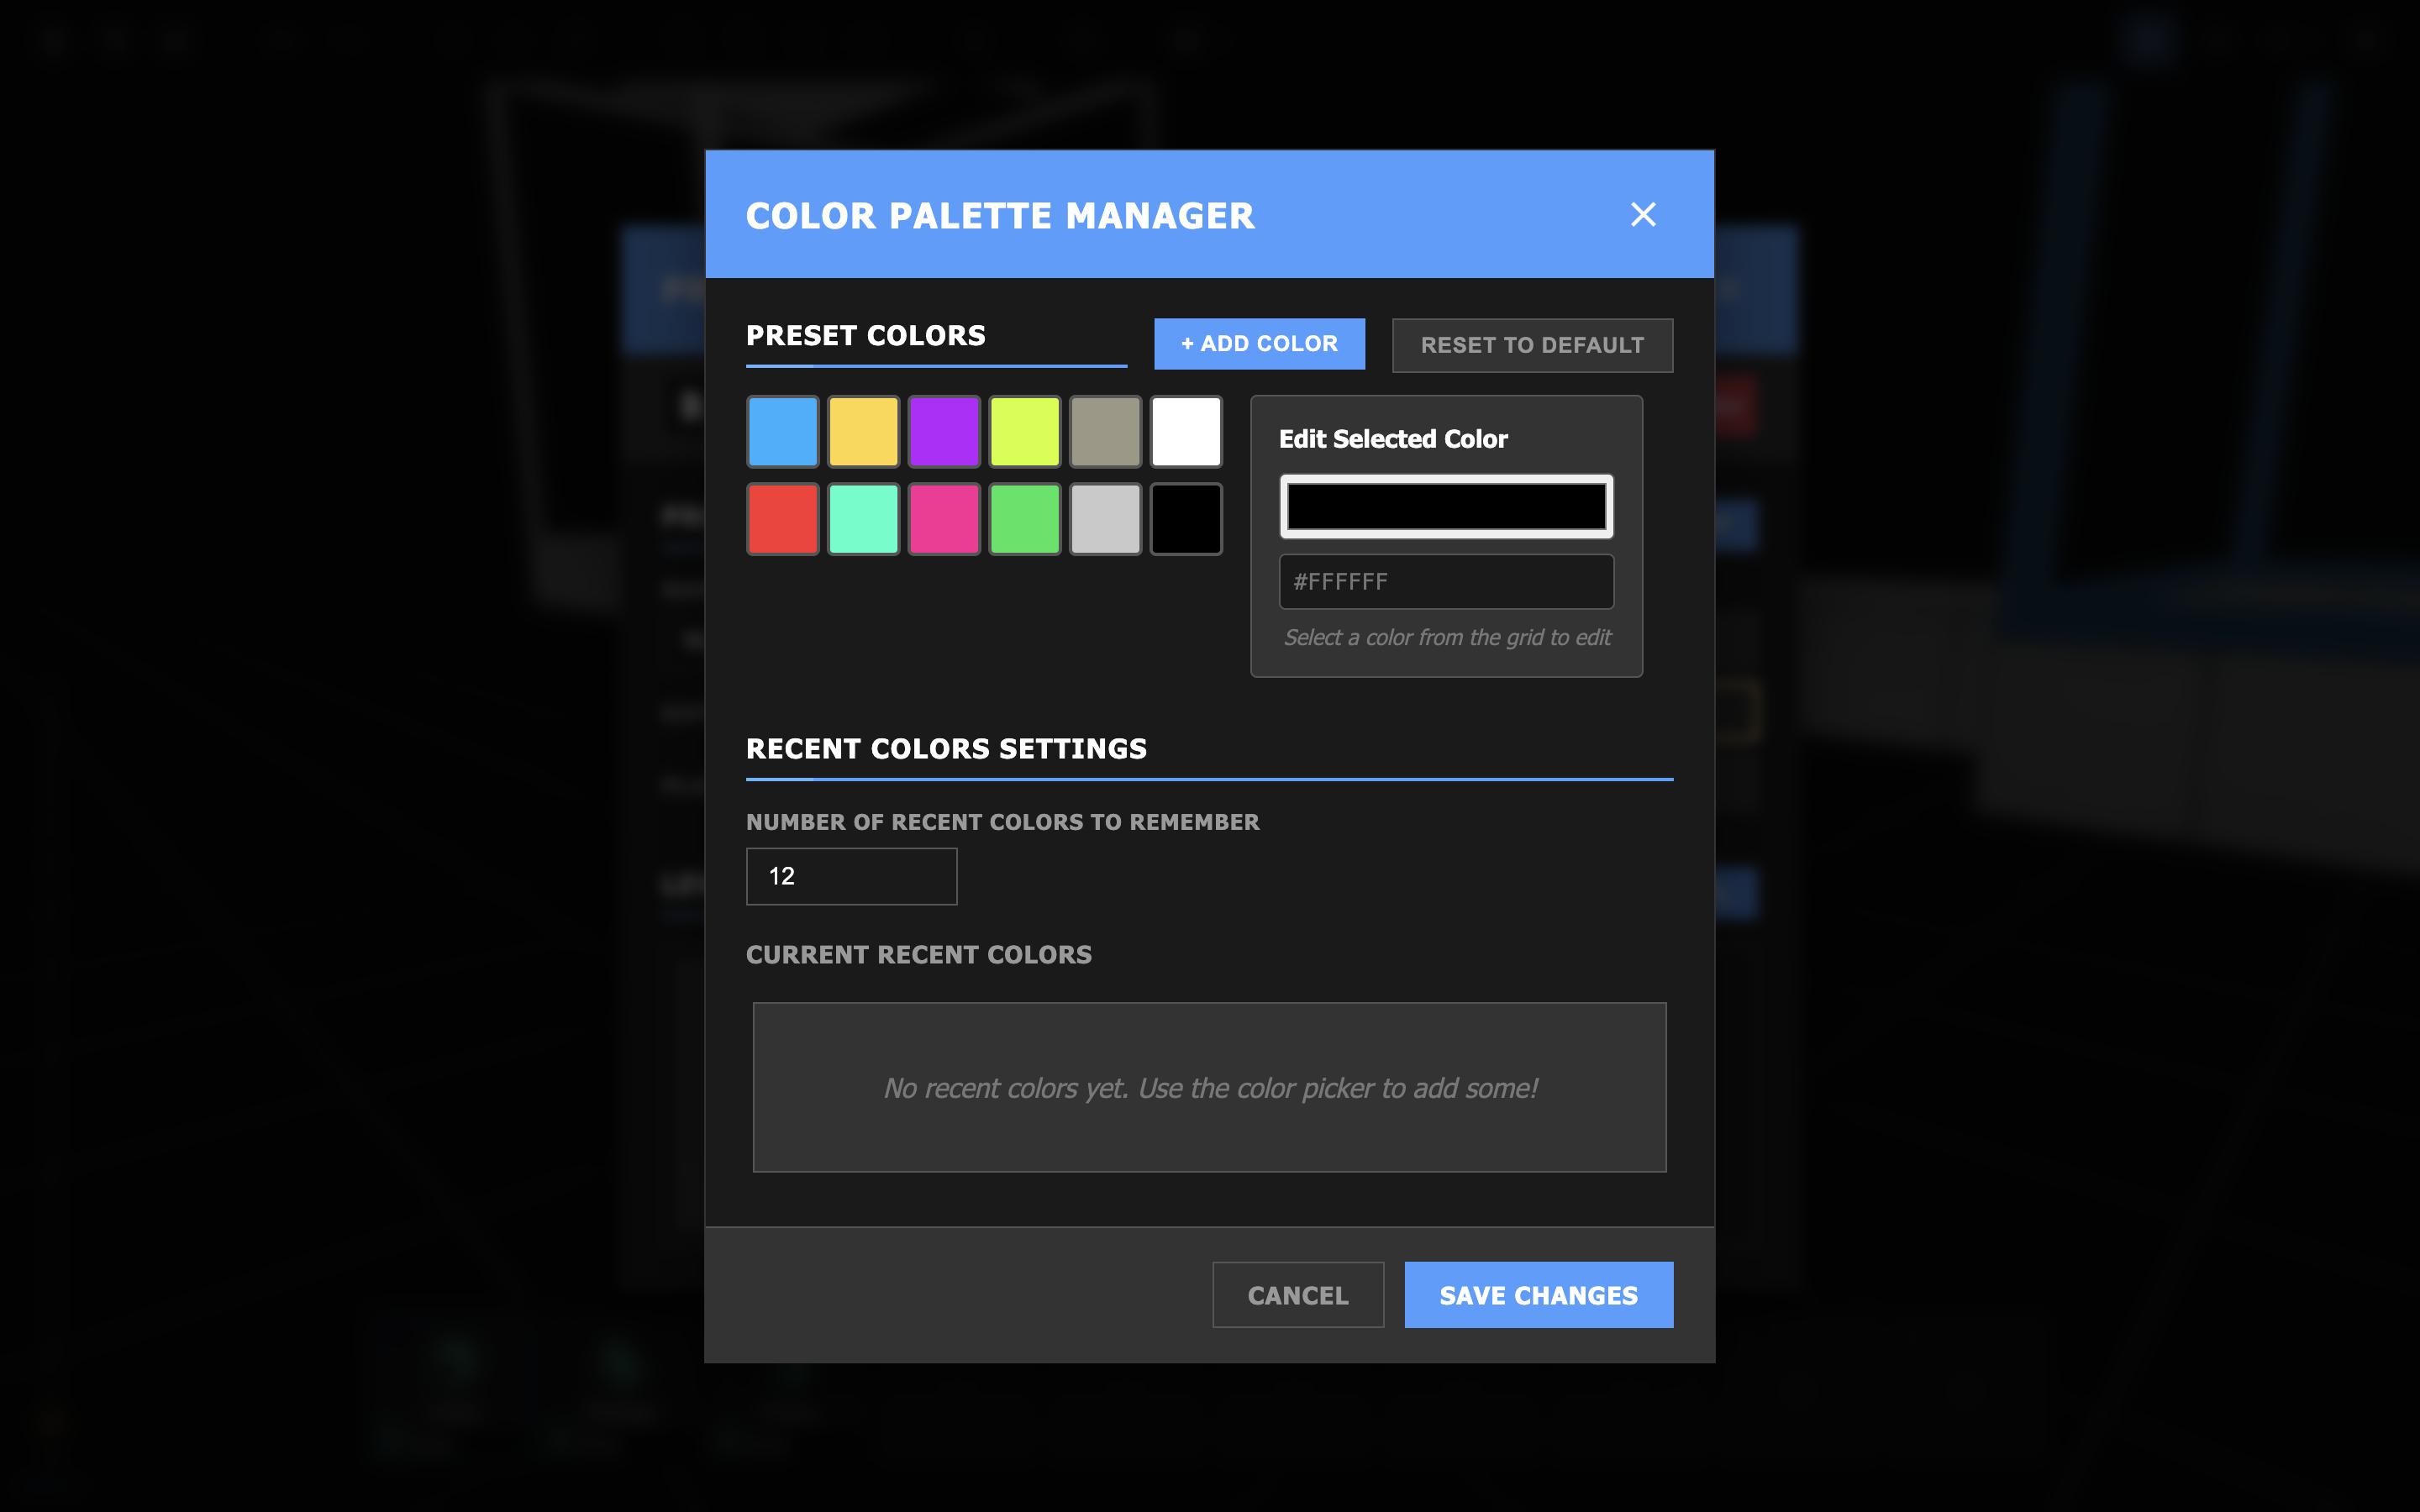
This menu can be opened from the Project Manager by clicking on the Colors ![]() button.
button.
Custom structures are structures that have been defined by the Builder on a per-project basis. To learn how to define one, read the page on creating custom structures.
The Custom Structures menu lets you easily add or delete structures. Custom structures can be imported and exported from this menu.

This menu can be opened from the Project Manager by clicking on the Structures ![]() button.
button.
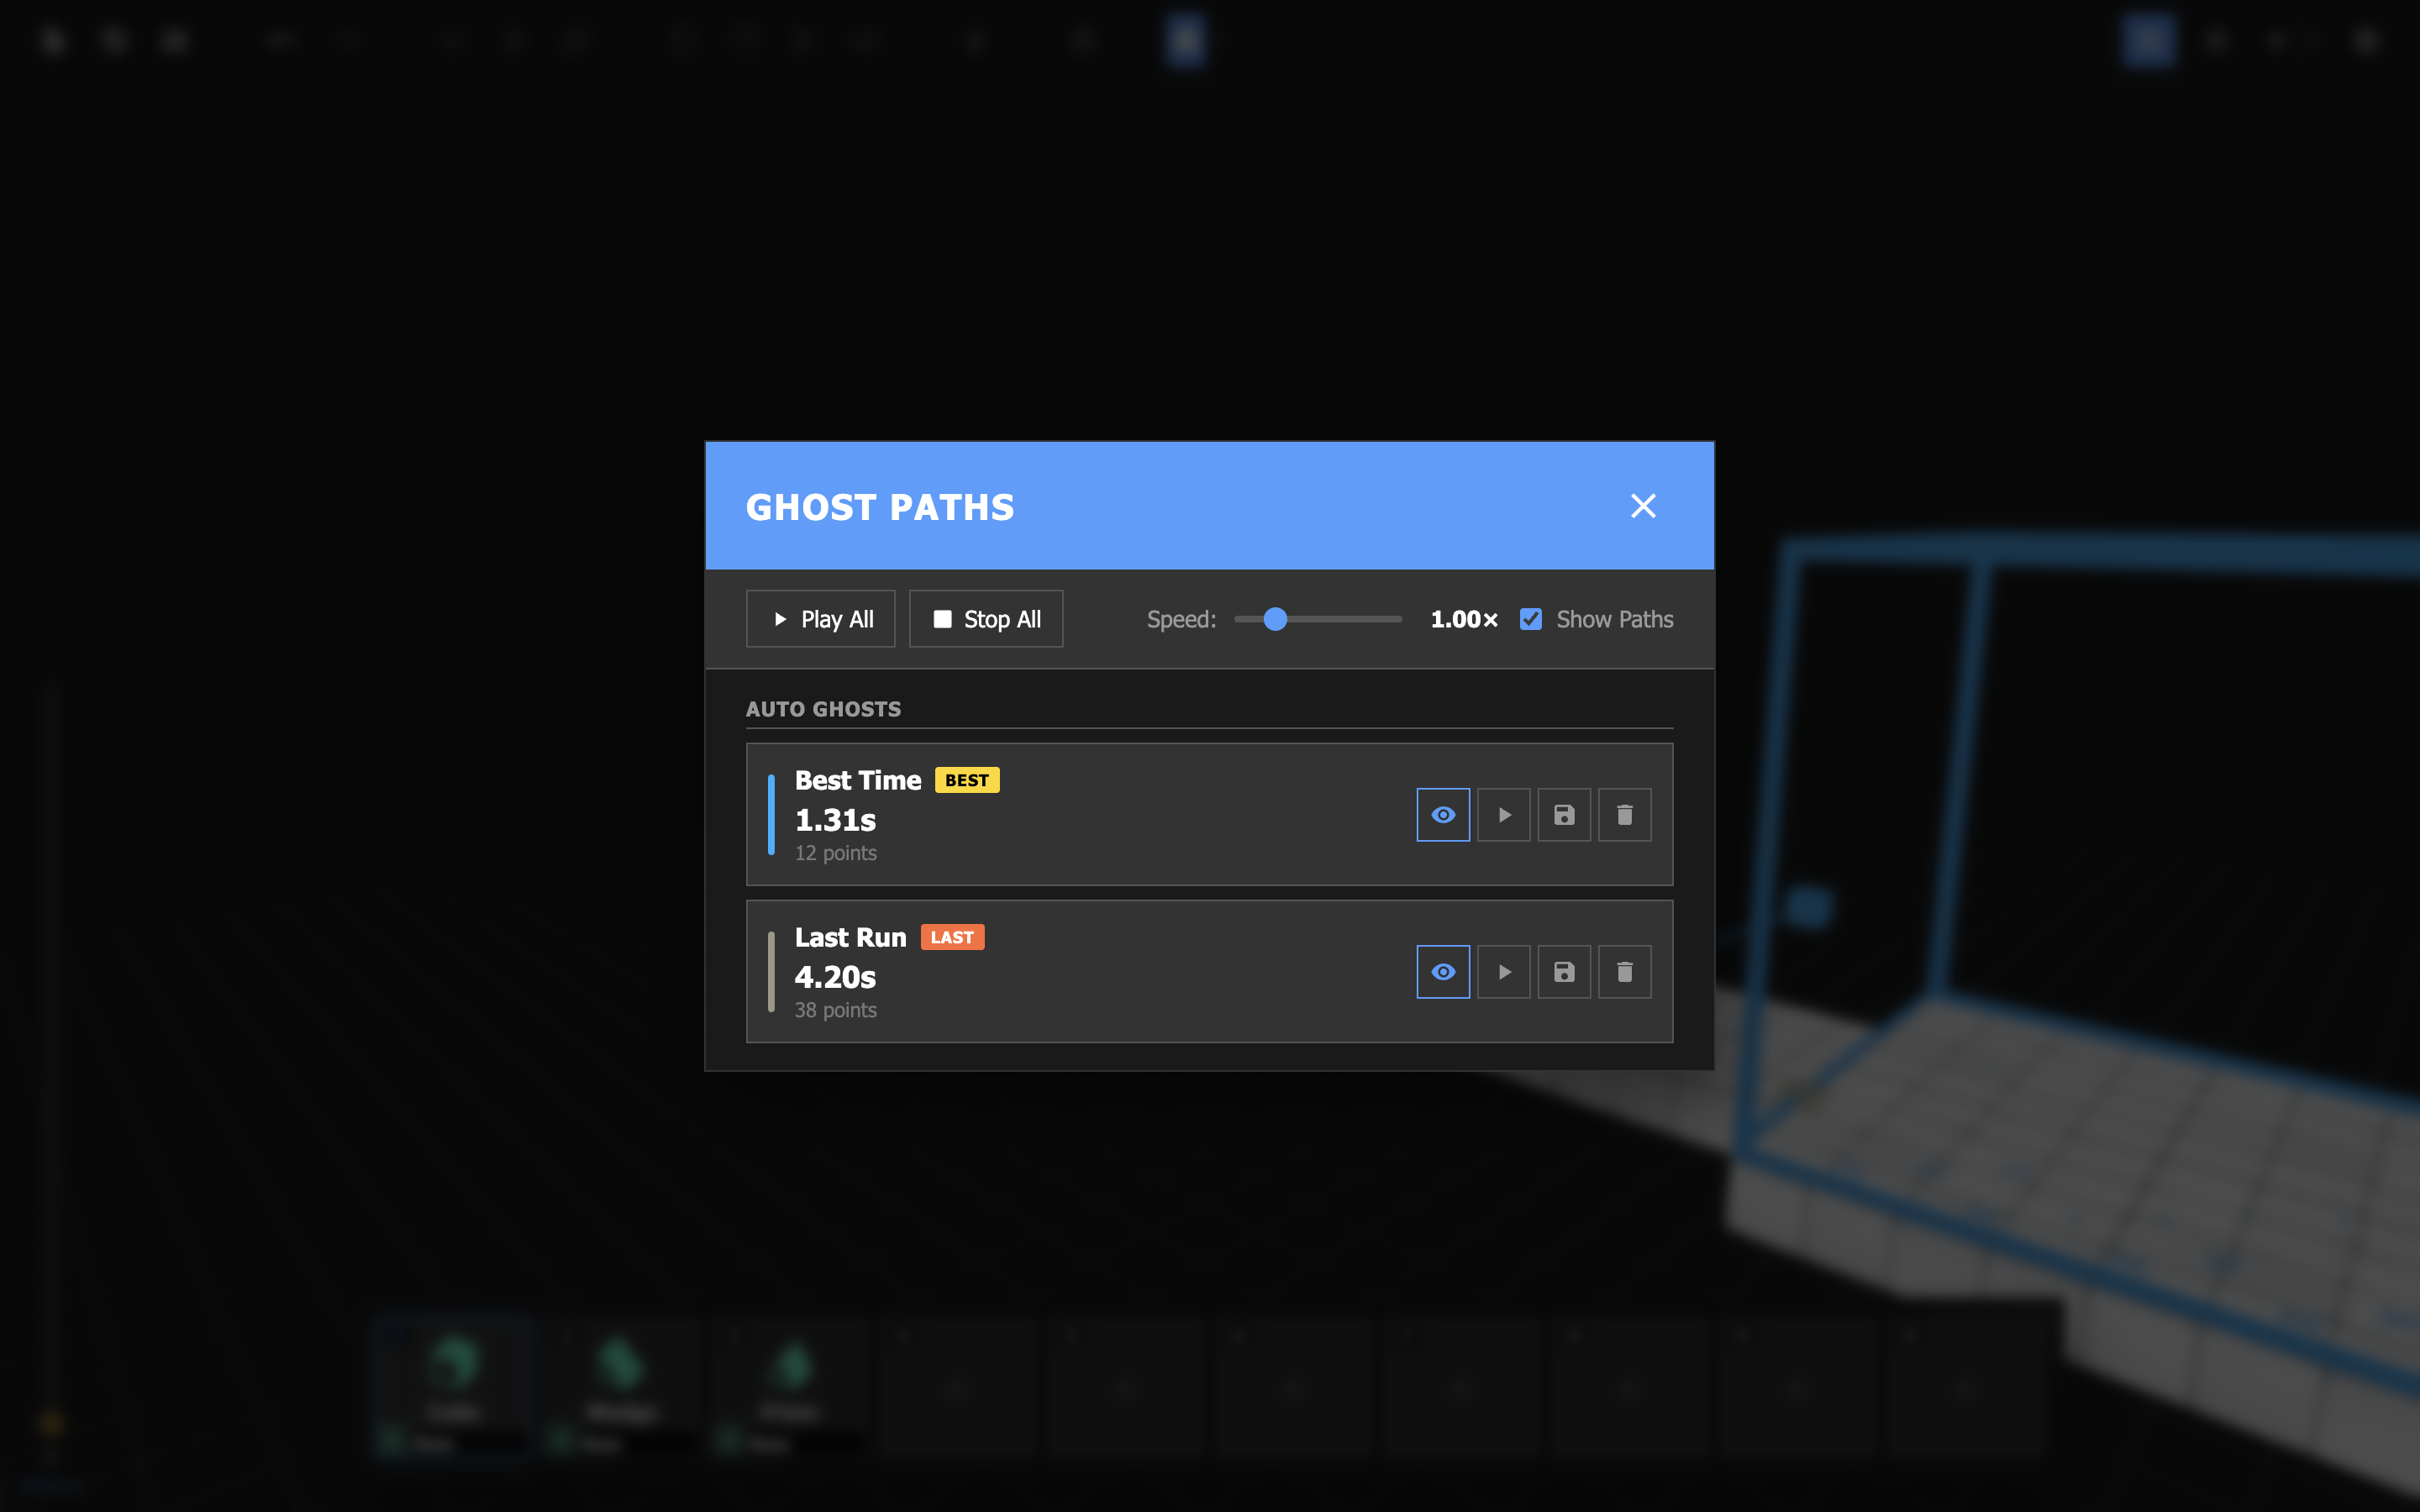
Ghost paths are playtesting data visualized within the scene. They show the path that you have taken from start to end, as well as the time spent completing a level.
Ghost paths are automatically recorded when you play through a level. They can be managed via the various toolbar ![]() actions.
actions.
The Ghost Paths Manager allows you to easily play, stop, hide, and delete the ghost paths stored in a level.
This menu can be opened from the toolbar by clicking on the dropdown next to Toggle Ghost Visibility ![]() button and selecting Open Ghost Paths Manager.
button and selecting Open Ghost Paths Manager.
The Inspector appears on the right-hand side of the editor when object(s) are selected. It shows all editable object parameters, and can be used to precisely modify an object's properties.
When something goes wrong, you will be automatically alerted by our Issues Detection System™. Any issue flagged will be traceable from the Issues menu.
An error will prevent the level from playing.

A warning is an issue that may cause problems, but does not strictly require fixing.

| Key | Action |
|---|---|
| Delete / Backspace | Delete selected object(s) |
| Ctrl+Z / Command+Z | Undo |
| Shift+Ctrl+Z / Shift+Command+Z | Redo |
| Ctrl+C / Command+C | Copy |
| Ctrl+V / Command+V | Paste |
| Ctrl+X / Command+X | Cut |
| Ctrl+D / Command+D | Duplicate |
| Tab | Cycle transform tool |
A level is a single scene in a project. For a level to be publishable, it must meet the following requirements:
If a level does not meet any of these requirements, an error will be thrown.
The Level Settings menu allows configuration of level and editor settings.
This menu can be opened from the toolbar by clicking on the Level Settings ![]() button.
button.
| Name | Description |
|---|---|
| Level Name | Appears upon entering a level and in the pause menu. |
| Level Size | The level's width and height. Objects outside of these bounds will create a warning in the Issues menu. Set to 3000x3000 by default. |
| Level Playlist | The level's soundtrack. |
| Name | Description |
|---|---|
| Auto | |
| Default | |
| Desert | |
| Void | |
| OVO |
| Name | Description |
|---|---|
| Skybox Type | The level's skybox texture. |
| Sky Color | If set to override, will override the skybox. |
| Fog Color | If set to override, will override the default fog color. |
| Fog Density | If set to override, will override the default fog density. |
Setting level times will allow you to award stars to Runners who beat the map within the specified number of seconds. Level times can be set from the Level Settings menu.
| Name | Description |
|---|---|
| 1 Star Time | The minimum required time to achieve 1 star. |
| 2 Star Time | The minimum required time to achieve 2 stars. |
| 3 Star Time | The minimum required time to achieve 3 stars. |
| 4 Star Time | The minimum required time to achieve a secret 4th star. |
If the time requirement for a star is set to 0, the star will not be available to Runners.
The Levels menu allows you to open, add, and reorganize levels.
This is a submenu that can be found within the Project Manager.
Objects are the basic building block of any level. These are your platforms, bounce pads, traffic cones, et cetera. Objects can easily be placed and manipulated from the scene view.
Object presets are specific predefined object types that can be used to generate new objects. A list of object presets can be found from the Object Preset menu.
All object presets have a position, size, and rotation/angle parameter.
Shapes are basic geometric objects. Don't be fooled by their simplicity—they have a wide variety of uses, ranging from blocking out levels to building custom structures.
| Name | Parameters | Right-click setter |
|---|---|---|
| Cube | Shape, Material, Color | Material |
| Wedge | Shape, Material, Color | Material |
| Prism | Shape, Material, Color | Material |
| Pyramid | Shape, Material, Color | Material |
| Corner Out | Shape, Material, Color | Material |
| Corner In | Shape, Material, Color | Material |
These most commonly used objects are grouped simply as "Objects." Anything you'll typically find as a platform in a level can be found here.
| Name | Parameters | Right-click setter |
|---|---|---|
| Wall | Shape, Material, Color | — |
| Yellow Wall | Shape, Material, Color | — |
| Tiled Floor | Shape, Material, Color | — |
| Bounce Pad | Shape, Material, Color | — |
| Speed Floor | Shape, Material, Color | — |
| Plank | Shape, Material, Color | Color |
| Metal Grate | Shape, Material, Color | — |
| Container | Shape, Material, Color | Color |
| Vent Pipe | Shape, Material, Color | — |
| Power Box | Shape, Material, Color | — |
| Cardboard Box | Shape, Material, Color | Color |
Special objects provide unique interactions. Some objects here, like Start Zone and End Zone, are necessary to play and complete a level.
| Name | Parameters | Right-click setter |
|---|---|---|
| Start Zone | Color | — |
| End Zone | Color | — |
| Door | Color, Open, Can Be Interacted | Color |
| Scatter | Shape, Material, Color, Collision, Randomize X, Randomize Y, Randomize Z, Randomize Angle, Animate Scale, Randomization Amount | Material |
| Secret | — | — |
| Inspectable | Inspect Distance, Inspect Text | Inspect Text |
Models are objects with unique geometry, material, and sometimes even animations that can be used to decorate your level.
| Name | Parameters | Right-click setter |
|---|---|---|
| Traffic Cone | Color | Color |
| Broken Concrete Pillar | Color, Collision | — |
| CCTV Camera | Color | — |
| Cable | Color | — |
| Pipe | Color | — |
| Pole | Color, Collision | — |
| Edge Tarp | Color | Color |
| Corner Tarp | Color | Color |
| Snowman | Color, Collision | — |
| Railing | Color, Collision | — |
| Wire Mesh | Color, Collision | — |
| Character Mannequin | Color, Skin, Animation, Animation Speed, Behavior | — |
Tags are a unique object type that can only be placed on the surfaces of other objects.
| Name | Parameters | Right-click setter |
|---|---|---|
| Text | Offset, Text Content, Font Size, Font Color, Font Face, Text Alignment | Text Content |
| Title | Offset, Text Content, Font Size, Font Color, Font Face, Text Alignment | Text Content |
| Tag | Tag, Offset, Color | Tag |
| Stripes | Offset, Color, Image Offset, Image Scale, Tile Randomization, Tile Randomization Amount, Tile Blend | Color |
| Arrows | Offset, Color, Image Offset, Image Scale, Tile Randomization, Tile Randomization Amount, Tile Blend | Color |
| Crosses | Offset, Color, Image Offset, Image Scale, Tile Randomization, Tile Randomization Amount, Tile Blend | Color |
Tags should not be used for any personal creative expression. You are obligated to stick to the list of legally acceptable messaging and imagery.
See the glossary page on structures.
| Name | Objects | Right-click setter |
|---|---|---|
| Cube + Wedge | Cube (1), Wedge (1) | — |
| Stairs | Cube (3) | — |
See the glossary page on custom structures.
The Object Preset menu contains every object preset at your disposal.
This menu can be opened by clicking on an empty slot in the Object tray, or by hovering over a non-empty slot and clicking on the pencil icon ![]() .
.
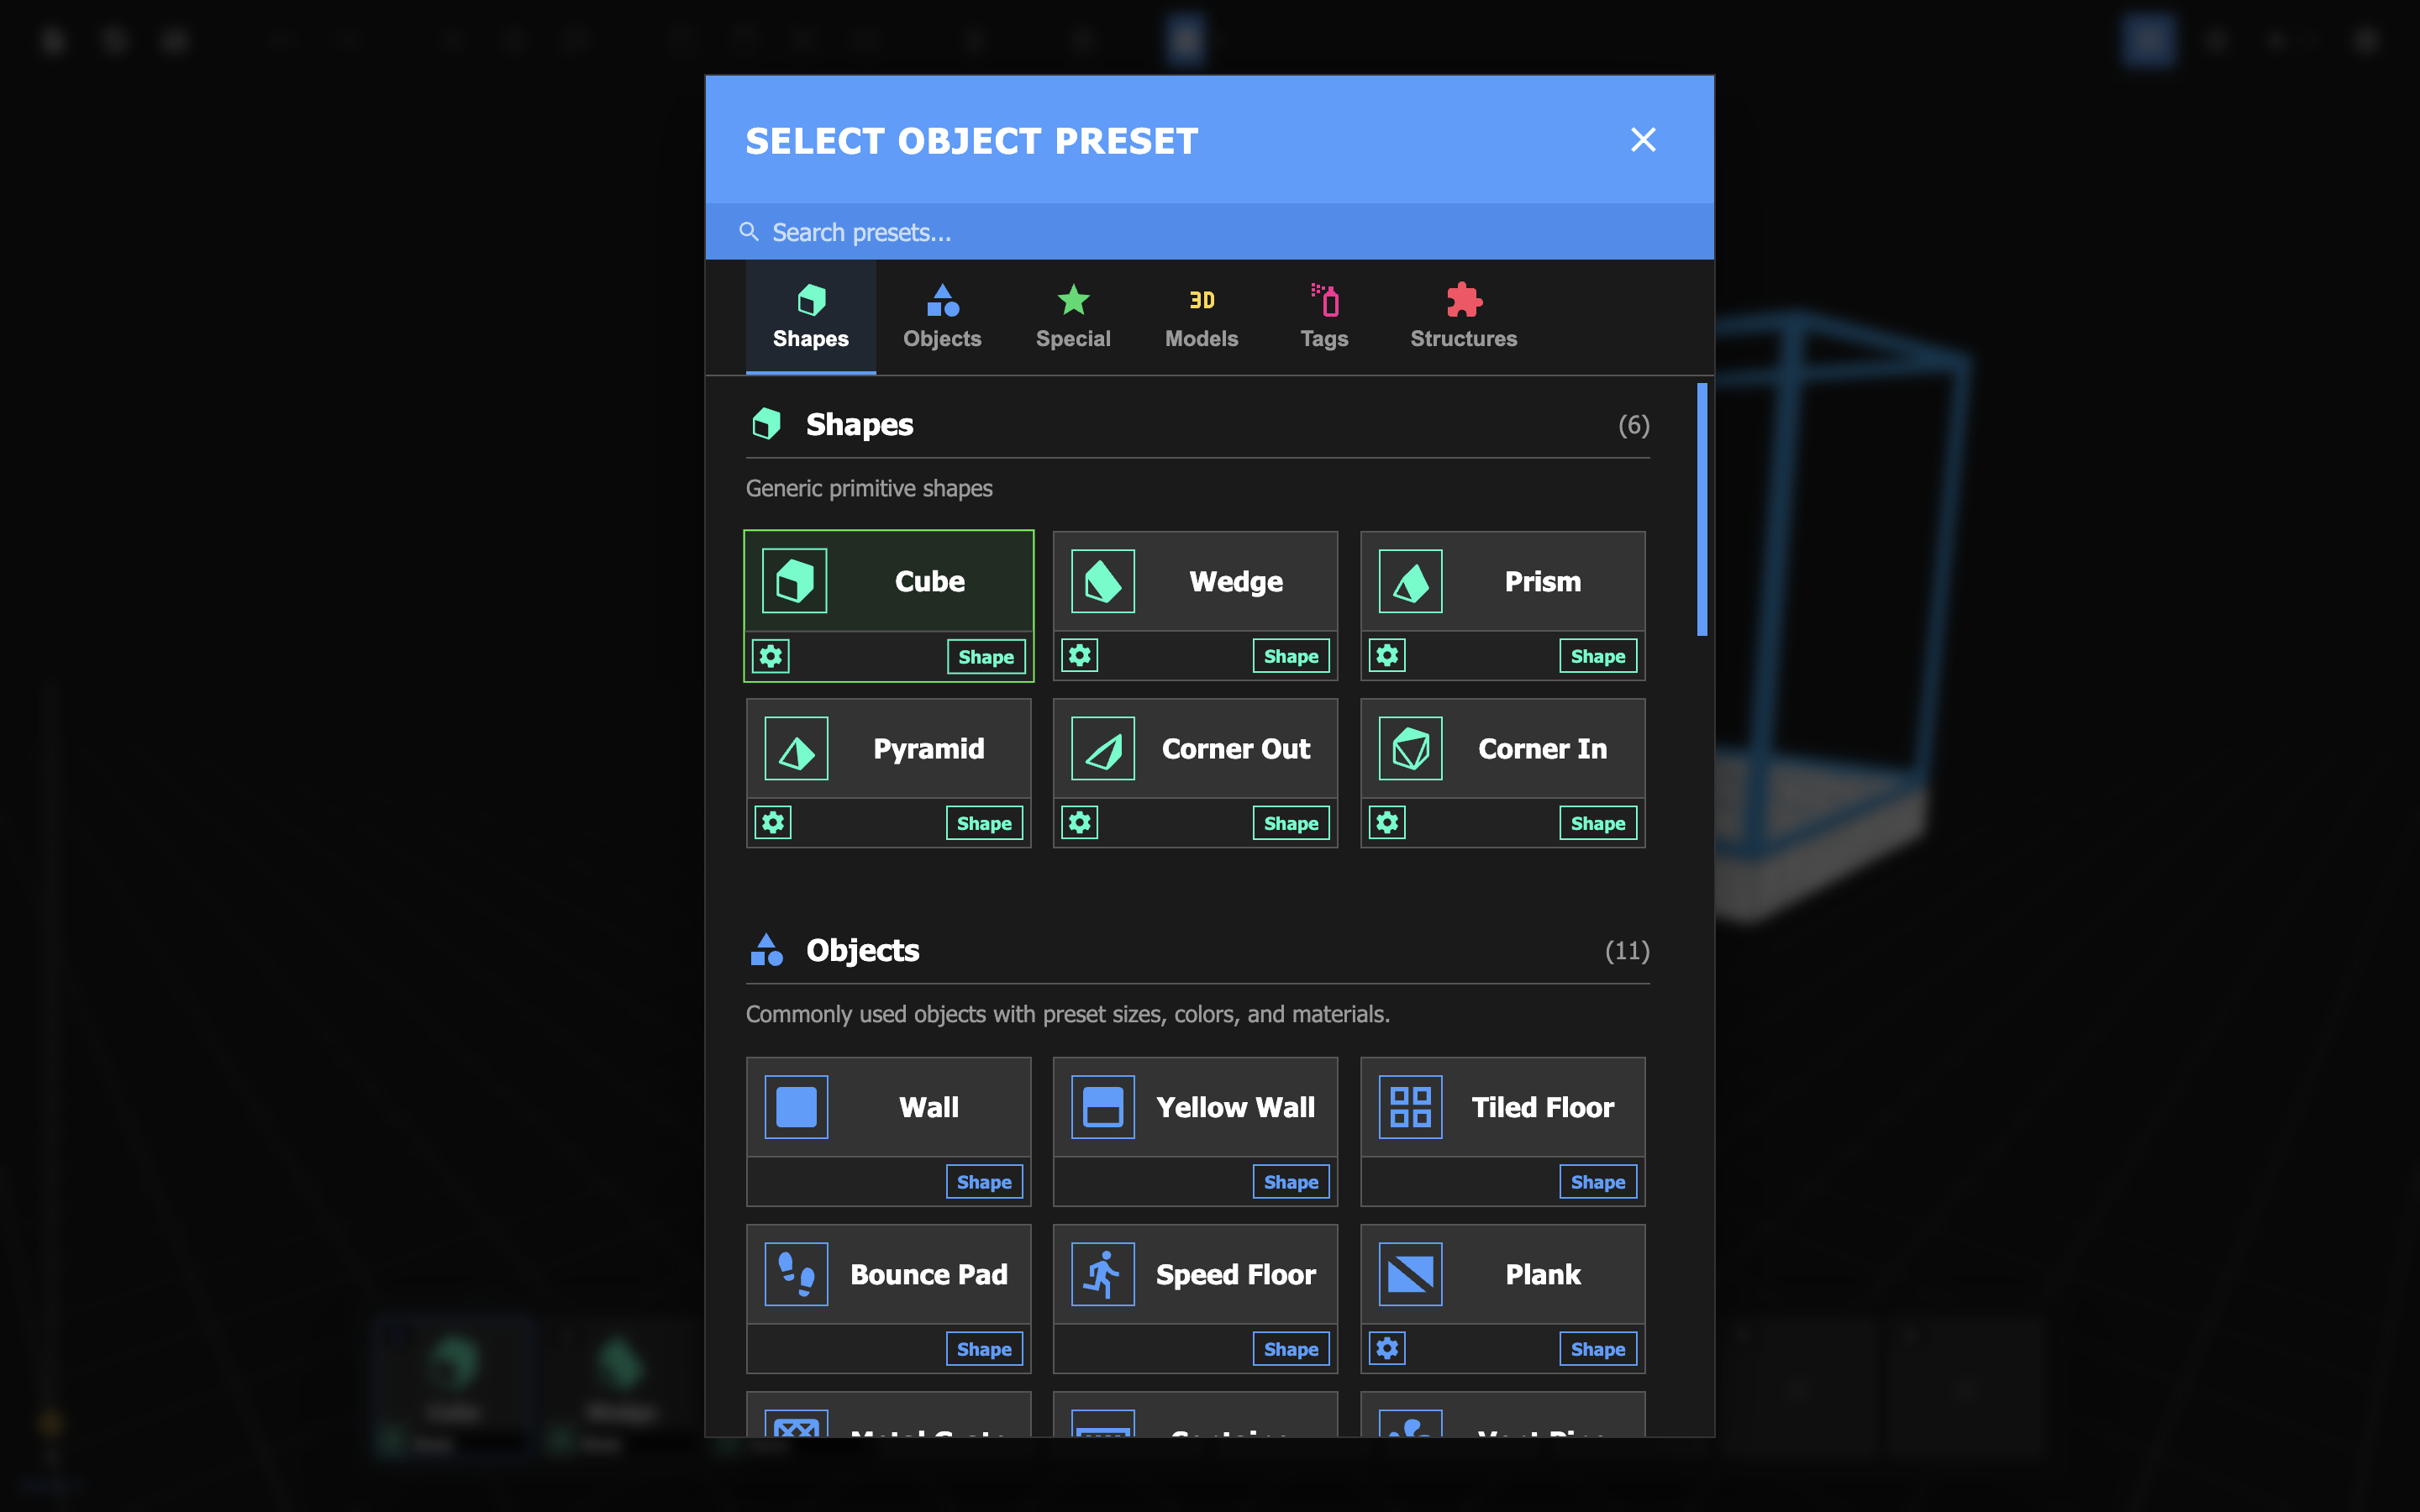
The object tray is located at the bottom of your editor, and contains slots for loading object presets.

A project is a sequence of levels that can be shared and tested by other Runners and Builders. New projects can be created and managed from the Welcome menu. Project information can be edited from the Project Manager.
The Project Manager contains information about the current open project.
This menu can be opened from the toolbar by clicking on the Project ![]() button.
button.
The scene view is what you will see immediately upon opening a project. It is the space where levels are built. It can be easily navigated using the scene camera.
The Steam Workshop (also known, simply, as Workshop) is where we store levels generated by you, the Builders. When you upload your finished project, that's where it will go. Other Builders and Runners will be able to find your levels there, if they have access to it.
The Workshop is accessible directly from your machine (next to the Level Editor) or via an external Steam program.
If your project is linked to a Workshop item, the item's metadata will be configurable via the Steam Workshop menu.
The Steam Workshop menu allows you to edit your Workshop item.
This menu can be opened from the toolbar by clicking on the Steam Workshop ![]() button.
button.
The following properties can be configured:
| Name | Description |
|---|---|
| Title | The title of the item. |
| Preview | The preview image that will be seen by users viewing the item. |
| Visibility | The item's visibility. Can be set to public, friends only, private, or unlisted. |
| Difficulty | The project's difficulty. |
| Description | A description of the project. |
Structures are preset groups of objects that can be instantiated just like any other object. Structures can also be user-defined.
The toolbar is a row of buttons above the scene view that contains various functions.
| Icon | Label | Description |
|---|---|---|
| Project | Opens the Project Manager. | |
| Steam Workshop | Opens the Steam Workshop menu. | |
| Save Project | Indicates whether there are unsaved changes. Saves project on click. | |
| Undo | Undoes the last change. | |
| Redo | Redoes the last undoed change. | |
| Move Tool | If an object is selected, enables the move tool. | |
| Rotate Tool | If an object is selected, enables the rotate tool. | |
| Scale Tool | If an object is selected, enables the scale tool. | |
| Copy | Copies the selected object(s). | |
| Paste | Pastes the copied object(s). | |
| Cut | Copies and removes the selected object(s). | |
| Duplicate | Duplicates the selected object(s). | |
| Delete | Deletes the selected object(s). |
| Icon | Label | Description |
|---|---|---|
| Create Custom Structure | Creates a custom structure composed of the selected object(s). | |
| Toggle Ghost Visibility | Toggles the visibility of ghost paths. | |
| Toggle Grid Snapping | Toggles whether objects snap to the grid when being moved or placed. | |
| (Variable) | Indicates whether the level contains issues. Opens the Issues menu. | |
| Play | Plays the level. | |
| Settings | Opens the Level Settings menu. |
The very first menu of the Level Editor™. From here, you can create and open projects.